Tuesday, December 31, 2013

JTable with TableModel

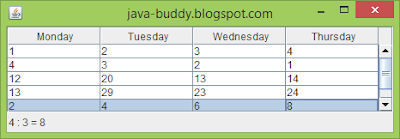
In this example, we will implement our TableModel for JTable, and also fix bugs in last example. It can be eddited, its column can be moved, the data in our TableModel will be updated after changed, and also implement a button to print all the updated result in System.out.

JTable with TableModel
JTable with TableModel 

package javamyframe;

import java.awt.BorderLayout;
import java.awt.Button;
import java.awt.Dimension;
import java.awt.Label;
import java.awt.event.ActionEvent;
import java.awt.event.ActionListener;
import javax.swing.BoxLayout;
import javax.swing.JFrame;
import javax.swing.JPanel;
import javax.swing.JScrollPane;
import javax.swing.JTable;
import javax.swing.SwingUtilities;
import javax.swing.event.ListSelectionEvent;
import javax.swing.event.ListSelectionListener;
import javax.swing.table.AbstractTableModel;

/**
 * @web http://java-buddy.blogspot.com/
 */
public class JavaMyFrame extends JFrame {

    Label labelInfo;
    JTable jTable;

    public static void main(String[] args) {
        
        SwingUtilities.invokeLater(() -> {
            createAndShowGUI();
        });
    }

    private static void createAndShowGUI() {
        JavaMyFrame myFrame = new JavaMyFrame();
        myFrame.setTitle("java-buddy.blogspot.com");
        myFrame.setDefaultCloseOperation(JFrame.EXIT_ON_CLOSE);
        myFrame.prepareUI();
        myFrame.pack();
        myFrame.setVisible(true);
    }
    
    private void prepareUI(){
        
        JPanel vPanel = new JPanel();
        vPanel.setLayout(new BoxLayout(vPanel, BoxLayout.Y_AXIS));
        
        jTable = new JTable(new MyTableModel());
        jTable.getSelectionModel()
                .addListSelectionListener(new MyRowListener());
        jTable.getColumnModel().getSelectionModel()
                .addListSelectionListener(new MyColListener());

        jTable.setFillsViewportHeight(true);
        JScrollPane jScrollPane = new JScrollPane(jTable);
        jScrollPane.setPreferredSize(new Dimension(450, 100));
        vPanel.add(jScrollPane);

        labelInfo = new Label();
        vPanel.add(labelInfo);
        
        Button buttonPrintAll = new Button("Print All");
        buttonPrintAll.addActionListener(new ActionListener(){

            @Override
            public void actionPerformed(ActionEvent e) {
                System.out.println();
                for(int i=0; i<jTable.getRowCount(); i++){
                    for(int j=0; j<jTable.getColumnCount(); j++){
                        String val = String.valueOf(jTable.getValueAt(i, j));
                        System.out.print(val + "\t");
                    }
                    System.out.println();
                }
            }
        });
        
        getContentPane().add(vPanel, BorderLayout.CENTER);
        getContentPane().add(buttonPrintAll, BorderLayout.PAGE_END);
    }
    
    private class MyRowListener implements ListSelectionListener {

        @Override
        public void valueChanged(ListSelectionEvent e) {

            if (!e.getValueIsAdjusting()) {
                System.out.println("valueChanged: " + e.toString());
                int row = jTable.getSelectedRow();
                int col = jTable.getSelectedColumn();
                
                /*
                // cannot access getValueAt(row, col) here...!
                // Otherwise ArrayIndexOutOfBoundsException when move column
                int selectedItem = (int)jTable.getValueAt(row, col);
                labelInfo.setText("MyRowListener: " 
                        + row + " : " + col + " = " + selectedItem);
                */
                labelInfo.setText("MyRowListener: " + row + " : " + col);

            }
        }
    }
    
    private class MyColListener implements ListSelectionListener {

        @Override
        public void valueChanged(ListSelectionEvent e) {

            if (!e.getValueIsAdjusting()) {
                System.out.println("valueChanged: " + e.toString());
                int row = jTable.getSelectedRow();
                int col = jTable.getSelectedColumn();
                
                /*
                // cannot access getValueAt(row, col) here...!
                // Otherwise ArrayIndexOutOfBoundsException when move column
                int selectedItem = (int)jTable.getValueAt(row, col);
                labelInfo.setText("MyColListener: " 
                        + row + " : " + col + " = " + selectedItem);
                */
                labelInfo.setText("MyRowListener: " + row + " : " + col);

            }
        }
    }
    
    class MyTableModel extends AbstractTableModel {
        private String[] DayOfWeek = {
            "Monday",
            "Tuesday",
            "Wednesday",
            "Thursday"};
    
        private Object[][] tableData = {
            {1, 2, 3, 4},
            {4, 3, 2, 1},
            {12, 20, 13, 14},
            {13, 29, 23, 24},
            {2, 4, 6, 8},
            {11, 21, 33, 4}};

        @Override
        public int getColumnCount() {
            return DayOfWeek.length;
        }

        @Override
        public int getRowCount() {
            return tableData.length;
        }

        @Override
        public String getColumnName(int col) {
            return DayOfWeek[col];
        }

        @Override
        public Object getValueAt(int row, int col) {
            return tableData[row][col];
        }

        @Override
        public Class getColumnClass(int c) {
            return getValueAt(0, c).getClass();
        }

        @Override
        public boolean isCellEditable(int row, int col) {
            return true;
        }

        @Override
        public void setValueAt(Object value, int row, int col) {
            tableData[row][col] = value;
            fireTableCellUpdated(row, col);
        }

    }
}


More:
- Display JTable data in line chart using JComponent

Monday, December 30, 2013

Java Coding Guidelines: 75 Recommendations for Reliable and Secure Programs (SEI Series in Software Engineering)

“A must-read for all Java developers. . . . Every developer has a responsibility to author code that is free of significant security vulnerabilities. This book provides realistic guidance to help Java developers implement desired functionality with security, reliability, and maintainability goals in mind.”
–Mary Ann Davidson, Chief Security Officer, Oracle Corporation  
Organizations worldwide rely on Java code to perform mission-critical tasks, and therefore that code must be reliable, robust, fast, maintainable, and secure. Java™ Coding Guidelines brings together expert guidelines, recommendations, and code examples to help you meet these demands.

Written by the same team that brought you The CERT® Oracle ® Secure Coding Standard for Java™, this guide extends that previous work’s expert security advice to address many additional quality attributes.

You’ll find 75 guidelines, each presented consistently and intuitively. For each guideline, conformance requirements are specified; for most, noncompliant code examples and compliant solutions are also offered. The authors explain when to apply each guideline and provide references to even more detailed information.

Reflecting pioneering research on Java security, Java™ Coding Guidelines offers updated techniques for protecting against both deliberate attacks and other unexpected events. You’ll find best practices for improving code reliability and clarity, and a full chapter exposing common misunderstandings that lead to suboptimal code.


With a Foreword by James A. Gosling, Father of the Java Programming Language


Sunday, December 29, 2013

Detect selection on individual cell in JTable

Last post of "Java Swing JTable and ListSelectionListener" implement MyListSelectionListener() for listSelectionModel. It can be noticed from the demo video that if click on another cell in the same row, MyListSelectionListener() will not be called.

In this post, two seperated ListSelectionListener, MyRowListener and MyColListener, are implemented and added to jTable.getSelectionModel() and jTable.getColumnModel().getSelectionModel(), to monitor individual cell selected .

Detect selection on individual cell in JTable

package javamyframe;

import java.awt.BorderLayout;
import java.awt.Dimension;
import java.awt.Label;
import javax.swing.BoxLayout;
import javax.swing.JFrame;
import javax.swing.JPanel;
import javax.swing.JScrollPane;
import javax.swing.JTable;
import javax.swing.ListSelectionModel;
import javax.swing.SwingUtilities;
import javax.swing.event.ListSelectionEvent;
import javax.swing.event.ListSelectionListener;

/**
 * @web http://java-buddy.blogspot.com/
 */
public class JavaMyFrame extends JFrame {

    Label labelInfo;
    JTable jTable;
    ListSelectionModel listSelectionModel;
    
    static final String DayOfWeek[] = {
        "Monday",
        "Tuesday",
        "Wednesday",
        "Thursday"};
    
    Object[][] tableData = {
        {1, 2, 3, 4},
        {4, 3, 2, 1},
        {12, 20, 13, 14},
        {13, 29, 23, 24},
        {2, 4, 6, 8},
        {11, 21, 33, 4}};

    public static void main(String[] args) {
        
        SwingUtilities.invokeLater(() -> {
            createAndShowGUI();
        });
    }

    private static void createAndShowGUI() {
        JavaMyFrame myFrame = new JavaMyFrame();
        myFrame.setTitle("java-buddy.blogspot.com");

        myFrame.setDefaultCloseOperation(JFrame.EXIT_ON_CLOSE);
        
        myFrame.prepareUI();

        myFrame.pack();
        myFrame.setVisible(true);
    }
    
    private void prepareUI(){
        
        JPanel vPanel = new JPanel();
        vPanel.setLayout(new BoxLayout(vPanel, BoxLayout.Y_AXIS));
        
        jTable = new JTable(tableData, DayOfWeek);
        jTable.setMaximumSize(new Dimension(10,10));

        listSelectionModel = jTable.getSelectionModel();
        jTable.getSelectionModel()
                .addListSelectionListener(new MyRowListener());
        jTable.getColumnModel().getSelectionModel()
                .addListSelectionListener(new MyColListener());
        jTable.setSelectionModel(listSelectionModel);

        jTable.setFillsViewportHeight(true);
        JScrollPane jScrollPane = new JScrollPane(jTable);
        jScrollPane.setPreferredSize(new Dimension(450, 100));
        vPanel.add(jScrollPane);

        labelInfo = new Label();

        vPanel.add(labelInfo);
        
        getContentPane().add(vPanel, BorderLayout.CENTER);
    }
    
    private class MyRowListener implements ListSelectionListener {

        @Override
        public void valueChanged(ListSelectionEvent e) {
            if (!e.getValueIsAdjusting()) {
                System.out.println("valueChanged: " + e.toString());
                int row = jTable.getSelectedRow();
                int col = jTable.getSelectedColumn();
                int selectedItem = (int)jTable.getValueAt(row, col);
                labelInfo.setText("MyRowListener: " 
                        + row + " : " + col + " = " + selectedItem);
            }
        }
    }
    
    private class MyColListener implements ListSelectionListener {

        @Override
        public void valueChanged(ListSelectionEvent e) {
            if (!e.getValueIsAdjusting()) {
                System.out.println("valueChanged: " + e.toString());
                int row = jTable.getSelectedRow();
                int col = jTable.getSelectedColumn();
                int selectedItem = (int)jTable.getValueAt(row, col);
                labelInfo.setText("MyColListener: " 
                        + row + " : " + col + " = " + selectedItem);
            }
        }
    }
}


Next: JTable with TableModel

Test if a IP address is reachable

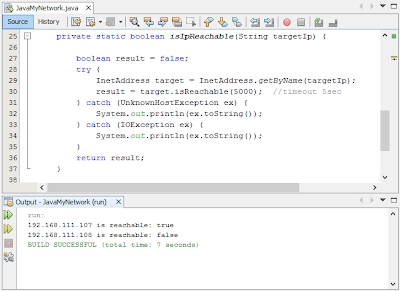
isReachable(int timeout) method of InetAddress class test whether that address is reachable.

Test if a IP address is reachable

package javamynetwork;

import java.io.IOException;
import java.net.InetAddress;
import java.net.UnknownHostException;

/**
 * @web http://java-buddy.blogspot.com/
 */
public class JavaMyNetwork {

    static String targetIP1 = "192.168.111.107";
    static String targetIP2 = "192.168.111.108";

    public static void main(String[] args) {

        String testIp = "192.168.111.107";
        System.out.println(testIp + " is reachable: " 
                + isIpReachable(testIp));
        testIp = "192.168.111.108";
        System.out.println(testIp + " is reachable: " 
                + isIpReachable(testIp));
    }

    private static boolean isIpReachable(String targetIp) {

        boolean result = false;
        try {
            InetAddress target = InetAddress.getByName(targetIp);
            result = target.isReachable(5000);  //timeout 5sec
        } catch (UnknownHostException ex) {
            System.out.println(ex.toString());
        } catch (IOException ex) {
            System.out.println(ex.toString());
        }
        return result;
    }

}


Java Swing JTable and ListSelectionListener

Example of Swing JTable and ListSelectionListener. JTable is used to display and edit regular two-dimensional tables of cells.

Example of JTable
Example of JTable

package javamyframe;

import java.awt.BorderLayout;
import java.awt.Dimension;
import java.awt.Label;
import javax.swing.BoxLayout;
import javax.swing.JFrame;
import javax.swing.JPanel;
import javax.swing.JScrollPane;
import javax.swing.JTable;
import javax.swing.ListSelectionModel;
import javax.swing.SwingUtilities;
import javax.swing.event.ListSelectionEvent;
import javax.swing.event.ListSelectionListener;

/**
 * @web http://java-buddy.blogspot.com/
 */
public class JavaMyFrame extends JFrame {

    Label labelInfo;
    JTable jTable;
    ListSelectionModel listSelectionModel;
    
    static final String DayOfWeek[] = {
        "Monday",
        "Tuesday",
        "Wednesday",
        "Thursday"};
    
    Object[][] tableData = {
        {1, 2, 3, 4},
        {4, 3, 2, 1},
        {12, 20, 13, 14},
        {13, 29, 23, 24},
        {2, 4, 6, 8},
        {11, 21, 33, 4}};

    public static void main(String[] args) {
        
        SwingUtilities.invokeLater(() -> {
            createAndShowGUI();
        });
    }

    private static void createAndShowGUI() {
        JavaMyFrame myFrame = new JavaMyFrame();
        myFrame.setTitle("java-buddy.blogspot.com");

        myFrame.setDefaultCloseOperation(JFrame.EXIT_ON_CLOSE);
        
        myFrame.prepareUI();

        myFrame.pack();
        myFrame.setVisible(true);
    }
    
    private void prepareUI(){
        
        JPanel vPanel = new JPanel();
        vPanel.setLayout(new BoxLayout(vPanel, BoxLayout.Y_AXIS));
        
        jTable = new JTable(tableData, DayOfWeek);
        jTable.setMaximumSize(new Dimension(10,10));

        listSelectionModel = jTable.getSelectionModel();
        listSelectionModel.addListSelectionListener(new MyListSelectionListener());
        jTable.setSelectionModel(listSelectionModel);

        jTable.setFillsViewportHeight(true);
        JScrollPane jScrollPane = new JScrollPane(jTable);
        jScrollPane.setPreferredSize(new Dimension(450, 100));
        vPanel.add(jScrollPane);

        labelInfo = new Label();

        vPanel.add(labelInfo);
        
        getContentPane().add(vPanel, BorderLayout.CENTER);
 
    }

    class MyListSelectionListener implements ListSelectionListener{

        @Override
        public void valueChanged(ListSelectionEvent e) {
            System.out.println("valueChanged: " + e.toString());
            int row = jTable.getSelectedRow();
            int col = jTable.getSelectedColumn();
            int selectedItem = (int)jTable.getValueAt(row, col);
            labelInfo.setText(row + " : " + col + " = " + selectedItem);
        }
        
    };
}


It can be noticed from the demo video that if click on another cell in the same row, MyListSelectionListener() will not be called. Read next post "Detect selection on individual cell in JTable".

Friday, December 27, 2013

java.util.Timer and javax.swing.Timer

Both java.util.Timer and javax.swing.Timer provide the same basic functionality, but java.util.Timer is more general and has more features. The javax.swing.Timer has two features that can make it a little easier to use with GUIs. First, its event handling metaphor is familiar to GUI programmers and can make dealing with the event-dispatching thread a bit simpler. Second, its automatic thread sharing means that you don't have to take special steps to avoid spawning too many threads. Instead, your timer uses the same thread used to make cursors blink, tool tips appear, and so on. 
~ source: http://docs.oracle.com/javase/7/docs/api/javax/swing/Timer.html

Last post show "JProgressBar and java.util.Timer/java.util.TimerTask run on non-ui thread". In this post, I will apply java.util.Timer (the top group), invoke code later in ui thread from non-ui thread (the middle group) and javax.swing.Timer (the bottom group).

java.util.Timer and javax.swing.Timer

package javatask;

import java.awt.BorderLayout;
import java.awt.Label;
import java.awt.event.ActionEvent;
import java.awt.event.ActionListener;
import java.util.TimerTask;
import javax.swing.BoxLayout;
import javax.swing.JButton;
import javax.swing.JFrame;
import javax.swing.JPanel;
import javax.swing.JProgressBar;
import javax.swing.JSeparator;
import javax.swing.SwingConstants;
import static javax.swing.SwingConstants.HORIZONTAL;
import javax.swing.SwingUtilities;

/**
 * @web http://java-buddy.blogspot.com/
 */
public class JavaTask extends JFrame
        implements ActionListener {

    Label labelInfo1, labelInfo2, labelInfo3;
    Label labelThread1, labelThread2, labelThread3;
    JProgressBar jProgressBar1, jProgressBar2, jProgressBar3;
    JButton buttonRun;

    java.util.Timer java_util_Timer;
    javax.swing.Timer javax_swing_Timer;

    public static void main(String[] args) {
        SwingUtilities.invokeLater(() -> {
            createAndShowGUI();
        });
    }

    private static void createAndShowGUI() {
        JavaTask myTaskFrame = new JavaTask();
        myTaskFrame.setDefaultCloseOperation(JFrame.EXIT_ON_CLOSE);
        myTaskFrame.prepareUI();
        myTaskFrame.pack();
        myTaskFrame.setVisible(true);

    }

    private void prepareUI() {

        JPanel vPanel = new JPanel();
        vPanel.setLayout(new BoxLayout(vPanel, BoxLayout.Y_AXIS));

        Label labelThreadMain = new Label("UI Thread: " + Thread.currentThread());
        vPanel.add(labelThreadMain);
        vPanel.add(new JSeparator(SwingConstants.HORIZONTAL));

        Label labelHeader1 = new Label("java.util.Timer");
        vPanel.add(labelHeader1);
        jProgressBar1 = new JProgressBar(HORIZONTAL, 0, 10);
        vPanel.add(jProgressBar1);
        labelInfo1 = new Label();
        vPanel.add(labelInfo1);
        labelThread1 = new Label();
        vPanel.add(labelThread1);
        vPanel.add(new JSeparator(SwingConstants.HORIZONTAL));

        Label labelHeader2 = new Label("java.util.Timer -> invokeLater");
        vPanel.add(labelHeader2);
        jProgressBar2 = new JProgressBar(HORIZONTAL, 0, 10);
        vPanel.add(jProgressBar2);
        labelInfo2 = new Label();
        vPanel.add(labelInfo2);
        labelThread2 = new Label();
        vPanel.add(labelThread2);
        vPanel.add(new JSeparator(SwingConstants.HORIZONTAL));

        Label labelHeader3 = new Label("javax.swing.Timer");
        vPanel.add(labelHeader3);
        jProgressBar3 = new JProgressBar(HORIZONTAL, 0, 10);
        vPanel.add(jProgressBar3);
        labelInfo3 = new Label();
        vPanel.add(labelInfo3);
        labelThread3 = new Label();
        vPanel.add(labelThread3);
        vPanel.add(new JSeparator(SwingConstants.HORIZONTAL));

        buttonRun = new JButton("Run");
        buttonRun.addActionListener(this);

        getContentPane().add(vPanel, BorderLayout.CENTER);
        getContentPane().add(buttonRun, BorderLayout.PAGE_END);
    }

    @Override
    public void actionPerformed(ActionEvent e) {
        if (e.getSource() == buttonRun) {

            if (java_util_Timer != null) {
                java_util_Timer.cancel();
            }
            if (javax_swing_Timer != null) {
                javax_swing_Timer.stop();
            }

            //use java.util.Timer() run in non-ui thread
            java_util_Timer = new java.util.Timer();
            TimerTask timeTask1 = new TimerTask() {

                private int progress = 0;
                private final int max_progress = 10;

                @Override
                public void run() {
                    if (progress == max_progress) {
                        java_util_Timer.cancel();
                        labelInfo1.setText("Finished");

                        SwingUtilities.invokeLater(() -> {
                            //run in ui thread
                            labelInfo2.setText("Finished");
                            labelThread2.setText(Thread.currentThread().toString());
                        });
                    } else {
                        progress++;
                        labelInfo1.setText("progress: " + getProgress());
                        jProgressBar1.setValue(getProgress());

                        SwingUtilities.invokeLater(() -> {
                            //run in ui thread
                            labelInfo2.setText("progress: " + getProgress());
                            jProgressBar2.setValue(getProgress());
                            labelThread2.setText(Thread.currentThread().toString());
                        });
                    }
                    labelThread1.setText(Thread.currentThread().toString());
                }

                int getProgress() {
                    return progress;
                }

            };

            java_util_Timer.schedule(timeTask1, 1000, 1000);

            //javax.swing.Timer run in ui thread
            javax_swing_Timer = new javax.swing.Timer(1000,
                    new ActionListener() {

                        private int progress = 0;
                        private final int max_progress = 10;

                        @Override
                        public void actionPerformed(ActionEvent e) {

                            if (progress == max_progress) {
                                javax_swing_Timer.stop();
                                labelInfo3.setText("Finished");
                            } else {
                                progress++;
                                labelInfo3.setText("progress: " + progress);
                                jProgressBar3.setValue(progress);
                            }
                            labelThread3.setText(Thread.currentThread().toString());
                        }
                    });
            javax_swing_Timer.setInitialDelay(1000);
            javax_swing_Timer.start();

        }
    }

}


Wednesday, December 25, 2013

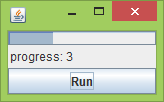
JProgressBar and java.util.Timer/java.util.TimerTask

JProgressBar and Timer
JProgressBar with Timer

package javatask;

import java.awt.BorderLayout;
import java.awt.Label;
import java.awt.event.ActionEvent;
import java.awt.event.ActionListener;
import java.util.Timer;
import java.util.TimerTask;
import javax.swing.BoxLayout;
import javax.swing.JButton;
import javax.swing.JFrame;
import javax.swing.JPanel;
import javax.swing.JProgressBar;
import static javax.swing.SwingConstants.HORIZONTAL;
import javax.swing.SwingUtilities;

/**
 * @web http://java-buddy.blogspot.com/
 */
public class JavaTask extends JFrame
        implements ActionListener {

    Label labelInfo;
    JButton buttonRun;
    JProgressBar jProgressBar1;
    
    Timer timer;

    public static void main(String[] args) {
        SwingUtilities.invokeLater(() -> {
            createAndShowGUI();
        });
    }

    private static void createAndShowGUI() {
        JavaTask myTaskFrame = new JavaTask();
        myTaskFrame.setDefaultCloseOperation(JFrame.EXIT_ON_CLOSE);
        myTaskFrame.prepareUI();
        myTaskFrame.pack();
        myTaskFrame.setVisible(true);

    }

    private void prepareUI() {

        JPanel vPanel = new JPanel();
        vPanel.setLayout(new BoxLayout(vPanel, BoxLayout.Y_AXIS));

        jProgressBar1 = new JProgressBar(HORIZONTAL, 0, 10);
        vPanel.add(jProgressBar1);
        
        labelInfo = new Label();
        vPanel.add(labelInfo);

        buttonRun = new JButton("Run");
        buttonRun.addActionListener(this);

        getContentPane().add(vPanel, BorderLayout.CENTER);
        getContentPane().add(buttonRun, BorderLayout.PAGE_END);
    }

    @Override
    public void actionPerformed(ActionEvent e) {
        if (e.getSource() == buttonRun) {
            labelInfo.setText("Run button click");

            if(timer != null){
                timer.cancel();
            }
            
            timer = new Timer(); 
            TimerTask timeTask = new TimerTask() {
                
                private int progress = 0;
                private final int max_progress = 10;

                @Override
                public void run() {
                    if(progress == max_progress){
                        timer.cancel();
                        labelInfo.setText("Finished");
                    }else{
                        progress++;
                        labelInfo.setText("progress: " + getProgress());
                        jProgressBar1.setValue(getProgress());
                    }
                }
                
                int getProgress(){
                    return progress;
                }

            };
                       
            timer.schedule(timeTask, 1000, 1000);
        }
    }
}


Remark: In this example, the ui elements are updated in TimerTask run on non-ui thread. If you want to update ui inside, you shoulad using javax.swing.Timer. Read next post: java.util.Timer and javax.swing.Timer.
~ thanks comment by Tomtom.

Tuesday, December 24, 2013

Example of Swing JList and ListSelectionListener

Example of JList and ListSelectionListener

package javamyframe;

import java.awt.BorderLayout;
import java.awt.Label;
import java.awt.event.ActionEvent;
import java.awt.event.ActionListener;
import javax.swing.BoxLayout;
import javax.swing.JButton;
import javax.swing.JFrame;
import javax.swing.JList;
import javax.swing.JPanel;
import javax.swing.JTextField;
import javax.swing.SwingUtilities;
import javax.swing.event.ListSelectionEvent;
import javax.swing.event.ListSelectionListener;

/**
 * @web http://java-buddy.blogspot.com/
 */
public class JavaMyFrame extends JFrame
    implements ActionListener, ListSelectionListener{

    JList jList1;
    JTextField textField2;
    Label labelInfo;
    JButton buttonAccept;
    
    static final String DayOfWeek[] = {
        "Monday",
        "Tuesday",
        "Wednesday",
        "Thursday",
        "Friday"};

    public static void main(String[] args) {
        
        SwingUtilities.invokeLater(new Runnable() {
            public void run() {
                createAndShowGUI();
            }
        });
    }

    private static void createAndShowGUI() {
        JavaMyFrame myFrame = new JavaMyFrame();

        myFrame.setDefaultCloseOperation(JFrame.EXIT_ON_CLOSE);
        
        myFrame.prepareUI();

        myFrame.pack();
        myFrame.setVisible(true);
    }
    
    private void prepareUI(){
        
        JPanel vPanel = new JPanel();
        vPanel.setLayout(new BoxLayout(vPanel, BoxLayout.Y_AXIS));
        JPanel hPanel = new JPanel();
        hPanel.setLayout(new BoxLayout(hPanel, BoxLayout.X_AXIS));
        
        jList1 = new JList(DayOfWeek);
        jList1.addListSelectionListener(this);

        textField2 = new JTextField(20);
        labelInfo = new Label();

        vPanel.add(textField2);
        vPanel.add(labelInfo);
        
        hPanel.add(jList1);
        hPanel.add(vPanel);
        
        buttonAccept = new JButton("Accept");
        buttonAccept.addActionListener(this);
        
        getContentPane().add(hPanel, BorderLayout.CENTER);
        getContentPane().add(buttonAccept, BorderLayout.PAGE_END);
    }

    @Override
    public void actionPerformed(ActionEvent e) {
        
        textField2.setText((String)jList1.getSelectedValue());
        
        if(e.getSource() == buttonAccept){
            labelInfo.setText("by buttonAccept");
        }else{
            labelInfo.setText("unknow source");
        }
    }

    @Override
    public void valueChanged(ListSelectionEvent e) {
        textField2.setText((String)jList1.getSelectedValue());
        labelInfo.setText("by jList1");
    }

}

Example of using Swing JSpinner

JSpinner and ChangeListener

package javamyframe;

import java.awt.BorderLayout;
import java.awt.Label;
import java.awt.event.ActionEvent;
import java.awt.event.ActionListener;
import javax.swing.BoxLayout;
import javax.swing.JButton;
import javax.swing.JFrame;
import javax.swing.JPanel;
import javax.swing.JSpinner;
import javax.swing.JTextField;
import javax.swing.SpinnerListModel;
import javax.swing.SwingUtilities;
import javax.swing.event.ChangeEvent;
import javax.swing.event.ChangeListener;

/**
 * @web http://java-buddy.blogspot.com/
 */
public class JavaMyFrame extends JFrame
    implements ActionListener, ChangeListener{

    JSpinner jSpinner1;
    JTextField textField2;
    Label labelInfo;
    JButton buttonAccept;
    
    static final String DayOfWeek[] = {
        "Monday",
        "Tuesday",
        "Wednesday",
        "Thursday",
        "Friday"};

    public static void main(String[] args) {
        
        SwingUtilities.invokeLater(new Runnable() {
            public void run() {
                createAndShowGUI();
            }
        });
    }

    private static void createAndShowGUI() {
        JavaMyFrame myFrame = new JavaMyFrame();

        myFrame.setDefaultCloseOperation(JFrame.EXIT_ON_CLOSE);
        
        myFrame.prepareUI();

        myFrame.pack();
        myFrame.setVisible(true);
    }
    
    private void prepareUI(){
        
        JPanel panel = new JPanel();
        panel.setLayout(new BoxLayout(panel, BoxLayout.Y_AXIS));
        
        SpinnerListModel modelDayOfWeek = new SpinnerListModel(DayOfWeek);
        jSpinner1 = new JSpinner(modelDayOfWeek);
        jSpinner1.addChangeListener(this);

        textField2 = new JTextField(20);
        labelInfo = new Label();
        panel.add(jSpinner1);
        panel.add(textField2);
        panel.add(labelInfo);
        
        buttonAccept = new JButton("Accept");
        buttonAccept.addActionListener(this);
        
        getContentPane().add(panel, BorderLayout.CENTER);
        getContentPane().add(buttonAccept, BorderLayout.PAGE_END);
    }

    @Override
    public void actionPerformed(ActionEvent e) {
        
        textField2.setText((String)jSpinner1.getValue());
        
        if(e.getSource() == buttonAccept){
            labelInfo.setText("by buttonAccept");
        }else{
            labelInfo.setText("unknow source");
        }
    }

    @Override
    public void stateChanged(ChangeEvent e) {
        
        textField2.setText((String)jSpinner1.getValue());
        if(e.getSource() == jSpinner1){
            labelInfo.setText("by jSpinner1");
        }
    }

}


Example of using Swing JComboBox

JComboBox and ActionListener

package javamyframe;

import java.awt.BorderLayout;
import java.awt.Label;
import java.awt.event.ActionEvent;
import java.awt.event.ActionListener;
import javax.swing.BoxLayout;
import javax.swing.JButton;
import javax.swing.JComboBox;
import javax.swing.JFrame;
import javax.swing.JPanel;
import javax.swing.JTextField;
import javax.swing.SwingUtilities;

/**
 * @web http://java-buddy.blogspot.com/
 */
public class JavaMyFrame extends JFrame
    implements ActionListener{

    JComboBox jComboBox1;
    JTextField textField2;
    Label labelInfo;
    JButton buttonAccept;
    
    static final String DayOfWeek[] = {
        "Monday",
        "Tuesday",
        "Wednesday",
        "Thursday",
        "Friday"};

    public static void main(String[] args) {
        
        SwingUtilities.invokeLater(new Runnable() {
            public void run() {
                createAndShowGUI();
            }
        });
    }

    private static void createAndShowGUI() {
        JavaMyFrame myFrame = new JavaMyFrame();

        myFrame.setDefaultCloseOperation(JFrame.EXIT_ON_CLOSE);
        
        myFrame.prepareUI();

        myFrame.pack();
        myFrame.setVisible(true);
    }
    
    private void prepareUI(){
        
        JPanel panel = new JPanel();
        panel.setLayout(new BoxLayout(panel, BoxLayout.Y_AXIS));
        
        jComboBox1 = new JComboBox(DayOfWeek);
        jComboBox1.setSelectedIndex(1);
        jComboBox1.addActionListener(this);
        
        textField2 = new JTextField(20);
        labelInfo = new Label();
        panel.add(jComboBox1);
        panel.add(textField2);
        panel.add(labelInfo);
        
        buttonAccept = new JButton("Accept");
        buttonAccept.addActionListener(this);
        
        getContentPane().add(panel, BorderLayout.CENTER);
        getContentPane().add(buttonAccept, BorderLayout.PAGE_END);
    }

    @Override
    public void actionPerformed(ActionEvent e) {
        textField2.setText((String)jComboBox1.getSelectedItem());
        
        if(e.getSource() == jComboBox1){
            labelInfo.setText("by jComboBox1");
        }else if(e.getSource() == buttonAccept){
            labelInfo.setText("by buttonAccept");
        }else{
            labelInfo.setText("unknow source");
        }
    }

}


Monday, December 23, 2013

Pro JSF and HTML5, second edition


Pro JSF and HTML5 shows you how to leverage the full potential of JavaServer Faces (JSF) and HTML5. This book is for Java developers who aspire to build sophisticated, enterprise-grade web experiences with HTML5-enabled JSF. Written by JSF experts and verified by established community figures, this book will serve as your primary resource, helping you build or integrate well-designed HTML5-enabled JSF components into your rich internet applications.

Pro JSF and HTML5 starts by giving you a firm grounding in the design principles of component-based frameworks and the basics of JSF. It then details recent advancements in JSF 2.2 that make it friendlier, faster, and more productive than ever before. And it covers HTML5-enabled components, integration with Java EE7 standards, 3rd party component libraries, security, and performance. The book concludes with a real-world application that puts everything you learned into practice.

In this book you'll learn

  • Foundational JSF topics such as the component life cycle, framework architecture, managed beans and CDI, expression language, conversion and validation, JSF events and view parameters.
  • Leveraging new features in JSF 2.2 such as Faces Flow, Resource Library Contracts, and Ajax file uploading.
  • Developing Advanced HTML5 enabled components in JSF 2.2.
  • Creating JSF 2.2 applications that utilize Java EE 7 technologies (CDI, JPA 2.1 and EJB 3.2) for bean management, transaction management and persistence.
  • Building advanced real-world JSF applications with considerations for security, performance, and usability.
If you're a Java developer interested in the world of component-based frameworks, Pro JSF and HTML5 is for you.


What you'll learn

  • Foundational JSF topics such as the component life cycle, framework architecture, managed beans and CDI (Context and Dependency Injection), expression language, exception handling, conversion and validation, JSF events (faces events, phase events and system events), and view parameters.
  • Utilizing new features in JSF 2.2 such as Faces Flow, Resource Library Contracts, and Ajax file uploading.
  • Developing Advanced HTML5 enabled components in JSF 2.2.
  • Developing PrimeFaces and RichFaces applications.
  • Developing JSF 2.2 applications that utilize Java EE 7 technologies (CDI, JPA 2.1 and EJB 3.2) in order to facilitate bean management, transaction management and persistence.
  • Unit testing JSF applications.
  • Stateless JSF views.
  • Implementing Security in JSF applications.
  • Tuning the performance of JSF applications.
  • Translating application requirements into a model and then implementing the model using JSF 2.2 and Java EE 7 technologies.
Who this book is for This is a tutorial and reference is for both intermediate and experienced Java enterprise and web application developers.

Example of using Swing JTextField

There are two JTextField and a button in this example. The actionPerformed() method which will be called when user complete text entry in textField1 by pressing Enter, or by clicking on buttonAccept. Then the text in textField1 will be copied to textField2.

Example of using JTextField

package javamyframe;

import java.awt.BorderLayout;
import java.awt.Label;
import java.awt.event.ActionEvent;
import java.awt.event.ActionListener;
import javax.swing.BoxLayout;
import javax.swing.JButton;
import javax.swing.JFrame;
import javax.swing.JPanel;
import javax.swing.JTextField;
import javax.swing.SwingUtilities;

/**
 * @web http://java-buddy.blogspot.com/
 */
public class JavaMyFrame extends JFrame
    implements ActionListener{

    JTextField textField1, textField2;
    Label labelInfo;
    JButton buttonAccept;

    public static void main(String[] args) {
        
        SwingUtilities.invokeLater(new Runnable() {
            public void run() {
                createAndShowGUI();
            }
        });
    }

    private static void createAndShowGUI() {
        JavaMyFrame myFrame = new JavaMyFrame();

        myFrame.setDefaultCloseOperation(JFrame.EXIT_ON_CLOSE);
        
        myFrame.prepareUI();

        myFrame.pack();
        myFrame.setVisible(true);
    }
    
    private void prepareUI(){
        
        JPanel panel = new JPanel();
        panel.setLayout(new BoxLayout(panel, BoxLayout.Y_AXIS));
        
        textField1 = new JTextField(20);
        textField1.addActionListener(this);
        textField2 = new JTextField(20);
        labelInfo = new Label();
        panel.add(textField1);
        panel.add(textField2);
        panel.add(labelInfo);
        
        buttonAccept = new JButton("Accept");
        buttonAccept.addActionListener(this);
        
        getContentPane().add(panel, BorderLayout.CENTER);
        getContentPane().add(buttonAccept, BorderLayout.PAGE_END);
    }

    @Override
    public void actionPerformed(ActionEvent e) {
        textField2.setText(textField1.getText());
        
        if(e.getSource() == textField1){
            labelInfo.setText("by textField1");
        }else if(e.getSource() == buttonAccept){
            labelInfo.setText("by buttonAccept");
        }else{
            labelInfo.setText("unknow source");
        }
    }

}


Sunday, December 22, 2013

Get number (int, float) from part of a string

Example to get number, int or float, from part of a string.
Get number (int, float) from part of a string

package javafx_convertnumber;

import java.util.Scanner;
import javafx.application.Application;
import javafx.event.ActionEvent;
import javafx.event.EventHandler;
import javafx.scene.Scene;
import javafx.scene.control.Button;
import javafx.scene.control.Label;
import javafx.scene.control.TextField;
import javafx.scene.layout.StackPane;
import javafx.scene.layout.VBox;
import javafx.stage.Stage;

/**
 * @web http://java-buddy.blogspot.com/
 */
public class JavaFX_convertNumber extends Application {
    
    @Override
    public void start(Stage primaryStage) {
        
        final TextField fieldInput = new TextField();
        final Label labelOrg = new Label();
        final Label labelReplaced = new Label();
        final Label labelInt = new Label();
        final Label labelLastInt = new Label();
        final Label labelLastFloat = new Label();
        
        Button btn = new Button();
        btn.setText("Convert");
        btn.setOnAction(new EventHandler<ActionEvent>() {
            
            @Override
            public void handle(ActionEvent event) {
                String org = fieldInput.getText();
                String replaced = org.replaceAll("[^0123456789.]", " ");
                labelOrg.setText(org);
                labelReplaced.setText("replaced: " + replaced);
                labelInt.setText("int: " + parseToInt(replaced));
                labelLastInt.setText("Last int: " + parseLastInt(replaced));
                labelLastFloat.setText("Last float: " + parseLastFloat(replaced));
            }
        });
        
        VBox vBox = new VBox();
        vBox.getChildren().addAll(fieldInput, labelOrg, labelReplaced, 
                labelInt, labelLastInt, labelLastFloat, btn);
        
        StackPane root = new StackPane();
        root.getChildren().add(vBox);
        
        Scene scene = new Scene(root, 300, 250);
        
        primaryStage.setTitle("Hello World!");
        primaryStage.setScene(scene);
        primaryStage.show();
    }

    public static void main(String[] args) {
        launch(args);
    }
    
    private int parseToInt(String in){
        int result = 0;
        try{
            result = Integer.parseInt(in);        
        }catch(NumberFormatException ex){
        }
        return result;
    }
    
    //get last int
    private int parseLastInt(String in){
        int result = 0;
        
        Scanner scanner = new Scanner(in);
        while(scanner.hasNext()){
            if(scanner.hasNextInt()){
                result = scanner.nextInt();
            }else{
                scanner.next(); //ignore
            }
        }
        return result;
    }
    
    //get last float
    private float parseLastFloat(String in){
        float result = (float)0.0;
        
        Scanner scanner = new Scanner(in);
        while(scanner.hasNext()){
            if(scanner.hasNextFloat()){
                result = scanner.nextFloat();
            }else{
                scanner.next(); //ignore
            }
        }
        return result;
    }
}

Simple steps to generate and run jar

It is simple steps to generate hello.jar from hello.java (with main() method) using javac and jar, then run the jar using java.
Simple steps to generate and run jar
  • Compile with javac to generate class file:

    javac hello.java
  • Generate jar file using jar:

    jar cf hello.jar hello.class

    option c - create a JAR file.
    option f - output to a file.
    hello.jar is the output file name
    last argument(s) can be more than one file that you want to include in your JAR file.
  • Run the jar using java:

    java -cf hello.jar hello

    -cf specify the classpath of hello.jar.
    hello is the class contains the main method.

Saturday, December 21, 2013

Example of using Swing JFileChooser

It's a example to use Swing JFileChooser.
Example of using Swing JFileChooser


package javamyframe;

import java.awt.BorderLayout;
import java.awt.Dimension;
import java.awt.event.ActionEvent;
import java.awt.event.ActionListener;
import java.io.File;
import javax.swing.JButton;
import javax.swing.JFileChooser;
import javax.swing.JFrame;
import javax.swing.JScrollPane;
import javax.swing.JTextArea;
import javax.swing.SwingUtilities;

/**
 * @web http://java-buddy.blogspot.com/
 */
public class JavaMyFrame extends JFrame 
    implements ActionListener{

    JTextArea textArea;
    JButton buttonOpenFile;
    
    public static void main(String[] args) {
        
        SwingUtilities.invokeLater(new Runnable() {
            public void run() {
                createAndShowGUI();
            }
        });
    }

    private static void createAndShowGUI() {
        JavaMyFrame myFrame = new JavaMyFrame();

        myFrame.setDefaultCloseOperation(JFrame.EXIT_ON_CLOSE);
        
        myFrame.prepareUI();

        myFrame.pack();
        myFrame.setVisible(true);
    }
    
    private void prepareUI(){
        textArea = new JTextArea();
        textArea.setEditable(false);
        JScrollPane panel = new JScrollPane(textArea);
        panel.setPreferredSize(new Dimension(300, 100));
        
        buttonOpenFile = new JButton("Open File");
        buttonOpenFile.addActionListener(this);
        
        getContentPane().add(panel, BorderLayout.CENTER);
        getContentPane().add(buttonOpenFile, BorderLayout.PAGE_END);
    }

    @Override
    public void actionPerformed(ActionEvent e) {
        
        if(e.getSource() == buttonOpenFile){
            final JFileChooser jFileChooser = new JFileChooser();
            int returnVal = jFileChooser.showOpenDialog(JavaMyFrame.this);
            if(returnVal == JFileChooser.APPROVE_OPTION){
                File file = jFileChooser.getSelectedFile();
                textArea.setText("Selected file: " + file.getName());
            }else if(returnVal == JFileChooser.CANCEL_OPTION){
                textArea.setText("Cancelled");
            }else if(returnVal == JFileChooser.ERROR_OPTION){
                textArea.setText("Error!");
            }else{
                textArea.setText("unknown...");
            }
        }
    }
}


Related: JavaFX 2.0: FileChooser - Open File Dialog

Example of using KeyListener

Example to implement KeyListener for Swing UI elements.
Example of using KeyListener

package javamyframe;

import java.awt.BorderLayout;
import java.awt.Dimension;
import java.awt.event.ActionEvent;
import java.awt.event.ActionListener;
import java.awt.event.KeyEvent;
import java.awt.event.KeyListener;
import javax.swing.JButton;
import javax.swing.JFrame;
import javax.swing.JScrollPane;
import javax.swing.JTextArea;
import javax.swing.SwingUtilities;

/**
 * @web http://java-buddy.blogspot.com/
 */
public class JavaMyFrame extends JFrame 
    implements KeyListener{

    JTextArea textArea;
    JButton buttonClear;
    
    String s = "";
    
    public static void main(String[] args) {
        
        SwingUtilities.invokeLater(new Runnable() {
            public void run() {
                createAndShowGUI();
            }
        });
    }

    private static void createAndShowGUI() {
        JavaMyFrame myFrame = new JavaMyFrame();

        myFrame.setDefaultCloseOperation(JFrame.EXIT_ON_CLOSE);
        
        myFrame.prepareUI();

        myFrame.pack();
        myFrame.setVisible(true);
    }
    
    private void prepareUI(){
        textArea = new JTextArea();
        textArea.setEditable(false);
        textArea.addKeyListener(this);
        JScrollPane panel = new JScrollPane(textArea);
        panel.setPreferredSize(new Dimension(300, 100));
        
        buttonClear = new JButton("Clear");
        buttonClear.addActionListener(anotherActionListener);
        
        getContentPane().add(panel, BorderLayout.CENTER);
        getContentPane().add(buttonClear, BorderLayout.PAGE_END);
    }
    
    ActionListener anotherActionListener = new ActionListener(){

        @Override
        public void actionPerformed(ActionEvent e) {
            s = "";
            textArea.setText(s);
        }
        
    };

    @Override
    public void keyTyped(KeyEvent e) {
        s += e.getKeyChar();
        textArea.setText(s);
    }

    @Override
    public void keyPressed(KeyEvent e) {}

    @Override
    public void keyReleased(KeyEvent e) {}
}


Related: Example of using ActionListener

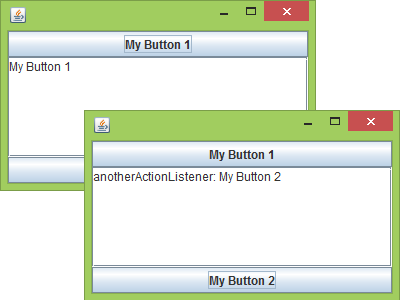
Example of using ActionListener

Example to implement ActionListener for Swing UI elements.

Example of using ActionListener

package javamyframe;

import java.awt.BorderLayout;
import java.awt.Dimension;
import java.awt.event.ActionEvent;
import java.awt.event.ActionListener;
import javax.swing.JButton;
import javax.swing.JFrame;
import javax.swing.JScrollPane;
import javax.swing.JTextArea;
import javax.swing.SwingUtilities;

/**
 * @web http://java-buddy.blogspot.com/
 */
public class JavaMyFrame extends JFrame 
    implements ActionListener{

    JTextArea textArea;
    JButton button1, button2;
    
    public static void main(String[] args) {
        SwingUtilities.invokeLater(new Runnable() {
            public void run() {
                createAndShowGUI();
            }
        });
    }

    private static void createAndShowGUI() {
        JavaMyFrame myFrame = new JavaMyFrame();

        myFrame.setDefaultCloseOperation(JFrame.EXIT_ON_CLOSE);
        
        myFrame.prepareUI();

        myFrame.pack();
        myFrame.setVisible(true);
    }
    
    private void prepareUI(){
        textArea = new JTextArea();
        textArea.setEditable(false);
        JScrollPane panel = new JScrollPane(textArea);
        panel.setPreferredSize(new Dimension(300, 100));
        
        button1 = new JButton("My Button 1");
        button1.addActionListener(this);
        button2 = new JButton("My Button 2");
        button2.addActionListener(anotherActionListener);
        
        getContentPane().add(panel, BorderLayout.CENTER);
        getContentPane().add(button1, BorderLayout.PAGE_START);
        getContentPane().add(button2, BorderLayout.PAGE_END);
    }

    @Override
    public void actionPerformed(ActionEvent e) {
        textArea.setText(e.getActionCommand());
    }
    
    ActionListener anotherActionListener = new ActionListener(){

        @Override
        public void actionPerformed(ActionEvent e) {
            textArea.setText("anotherActionListener: " 
                    + e.getActionCommand());
        }
        
    };
}


Related: Example of using KeyListener

Tuesday, December 17, 2013

Check type (int, float...) of args

The example check the type of the first argument:

class hello{
    public static void main(String args[])
    { 
        if(args.length == 0){
            System.out.println("No args");
            System.exit(0);
        }
        
        if(isInt(args[0]) == true){
            System.out.println("args[0] is a integer");
        }else if(isFloat(args[0]) == true){
            System.out.println("args[0] is a float");
        }else{
            System.out.println("other");
        }
        
        System.exit(0);
    }
    
    static private boolean isInt(String str){
        
        boolean result = false;
        try{
             int num = Integer.parseInt(str);
             result = true;
        } catch (NumberFormatException e) {
        }
        return result;
    }
    
    static private boolean isFloat(String str){
        
        boolean result = false;
        try{
             float num = Float.parseFloat(str);
             result = true;
        } catch (NumberFormatException e) {
        }
        return result;
    }
}


Monday, December 16, 2013

NetBeans IDE 7.4 Patch 2 Now Available

An update notification will appear in the NetBeans IDE 7.4.
Click the notification to install the updates.
(You can also download the fixes through the NetBeans IDE Plugin Manager.)

source: https://netbeans.org/community/news/show/1605.html

Sunday, December 15, 2013

HelloWorld: JDK8 x IntelliJ IDEA 13

To create a dummy "Hello World" with newest IntelliJ IDEA 13 and JDK8 8 (Early Access Releases) on Windows 8.1.
HelloWorld: JDK8 x IntelliJ IDEA 13
HelloWorld: JDK8 x IntelliJ IDEA 13 on Windows 8.1
- Download and install IntelliJ IDEA 13.

- Download and install JDK 8 Early Access Releases.


- Create a "Hello World" project in IntelliJ IDEA.


helloworld.java
package com.javabuddy.helloworld;

/**
 * @web http://java-buddy.blogspot.com/
 */
public class helloworld {

    public static void main(String[] args){
        System.out.println("Hello World!");
        System.out.println("running: " + System.getProperty("java.version"));
    }

}


Friday, December 13, 2013

Format currency with NumberFormat.getCurrencyInstance()

Example to print formatted currency with NumberFormat.getCurrencyInstance():

package java_numberformat;

import java.text.NumberFormat;
import java.util.Locale;

/**
 * @web java-buddy.blogspot.com
 */
public class Java_NumberFormat {

    public static void main(String[] args) {
        
        double val = 12345.6789;
        
        System.out.println("US:\t" + NumberFormat
                .getCurrencyInstance(Locale.US)
                .format(val));
        System.out.println("CHINESE:\t" + NumberFormat
                .getCurrencyInstance(Locale.CHINESE)
                .format(val));
        System.out.println("CHINA:\t" + NumberFormat
                .getCurrencyInstance(Locale.CHINA)
                .format(val));
        System.out.println("UK:\t" + NumberFormat
                .getCurrencyInstance(Locale.UK)
                .format(val));
        System.out.println("GERMANY:\t" + NumberFormat
                .getCurrencyInstance(Locale.GERMANY)
                .format(val));
        System.out.println("GERMAN:\t" + NumberFormat
                .getCurrencyInstance(Locale.GERMAN)
                .format(val));
        System.out.println("FRANCE:\t" + NumberFormat
                .getCurrencyInstance(Locale.FRANCE)
                .format(val));
        System.out.println("FRENCH:\t" + NumberFormat
                .getCurrencyInstance(Locale.FRENCH)
                .format(val));
        System.out.println("ITALIAN:\t" + NumberFormat
                .getCurrencyInstance(Locale.ITALIAN)
                .format(val));
        System.out.println("ITALY:\t" + NumberFormat
                .getCurrencyInstance(Locale.ITALY)
                .format(val));
    }
    
}

print formatted currency with NumberFormat.getCurrencyInstance()

Format currency with DecimalFormat and DecimalFormatSymbols

Example to print formatted currency with DecimalFormat and DecimalFormatSymbol:

package java_decimalformat;

import java.text.DecimalFormat;
import java.text.DecimalFormatSymbols;

/**
 * @web java-buddy.blogspot.com
 */
public class Java_DecimalFormat {

    public static void main(String[] args) {
        
        DecimalFormatSymbols decimalFormatSymbols = 
                new DecimalFormatSymbols();
        decimalFormatSymbols.setGroupingSeparator('\'');
        decimalFormatSymbols.setDecimalSeparator('.');

        DecimalFormat decimalFormat = 
                new DecimalFormat("€ #,###.00", decimalFormatSymbols);
        System.out.println(decimalFormat.format(12345.6789));
        decimalFormat = 
                new DecimalFormat("€ #,###.00####", decimalFormatSymbols);
        System.out.println(decimalFormat.format(12345.6789));
        
        decimalFormat = 
                new DecimalFormat("€ #,###.0000", decimalFormatSymbols);
        System.out.println(decimalFormat.format(0.654321));
        decimalFormat = 
                new DecimalFormat("€ #,##0.0000", decimalFormatSymbols);
        System.out.println(decimalFormat.format(0.654321));
    }

}

print formatted currency with DecimalFormat and DecimalFormatSymbol

RESTful Java with JAX-RS 2.0


Learn how to design and develop distributed web services in Java, using RESTful architectural principles and the JAX-RS 2.0 specification in Java EE 7. By focusing on implementation rather than theory, this hands-on reference demonstrates how easy it is to get started with services based on the REST architecture.

With the book’s technical guide, you’ll learn how REST and JAX-RS work and when to use them. The RESTEasy workbook that follows provides step-by-step instructions for installing, configuring, and running several working JAX-RS examples, using the JBoss RESTEasy implementation of JAX-RS 2.0.
  • Learn JAX-RS 2.0 features, including a client API, server-side asynchronous HTTP, and filters and interceptors
  • Examine the design of a distributed RESTful interface for an e-commerce order entry system
  • Use the JAX-RS Response object to return complex responses to your client (ResponseBuilder)
  • Increase the performance of your services by leveraging HTTP caching protocols
  • Deploy and integrate web services within Java EE7, servlet containers, EJB, Spring, and JPA
  • Learn popular mechanisms to perform authentication on the Web, including client-side SSL and OAuth 2.0

Thursday, December 12, 2013

The New Internet of Things Community on Java.net

Jim Weaver, Gerrit Grunwald and Yolande Poirier discussed the new Internet of Things community on Java.net and how people can share blogs, tweets, projects and training. Link: https://community.java.net/community/iot

Reverse, Shuffle and Sort List

Example:
package java_reverselist;

import java.util.ArrayList;
import java.util.Arrays;
import java.util.Collections;
import java.util.List;

/**
 * @web java-buddy.blogspot.com
 */
public class Java_ReverseList {

    @SuppressWarnings("empty-statement")
    public static void main(String[] args) {
        
        List<String> list = 
                Arrays.asList("A", "B", "C", "D", 
                        "E", "F", "G", "H", "I", "J");
        
        System.out.println("original list:");
        for(String s: list){
            System.out.print(s);
        }
        
        Collections.reverse(list);
        System.out.println("\nreversed list:");
        for(String s: list){
            System.out.print(s);
        }

        Collections.shuffle(list);
        System.out.println("\nshuffled list:");
        for(String s: list){
            System.out.print(s);
        }
        
        Collections.sort(list);
        System.out.println("\nsorted list:");
        for(String s: list){
            System.out.print(s);
        }

        System.out.println("\n");
    }
    
}


Reverse, Shuffle and Sort List

Reverse list using Collections.reverse()

To re-order list elements in reversed, we can call the static Collections.reverse(list) method.

package java_reverselist;

import java.util.ArrayList;
import java.util.Collections;
import java.util.List;

/**
 * @web java-buddy.blogspot.com
 */
public class Java_ReverseList {

    public static void main(String[] args) {
        List<String> list = new ArrayList<String>();
        
        list.add("A");
        list.add("B");
        list.add("C");
        list.add("D");
        list.add("E");
        
        System.out.println("original list");
        for(String s: list){
            System.out.print(s);
        }
        
        Collections.reverse(list);
        System.out.println("\nreversed list");
        for(String s: list){
            System.out.print(s);
        }
        System.out.println("\n");
    }
    
}

Reverse list
Reverse list
more: Reverse, Shuffle and Sort List

Wednesday, December 11, 2013

Example of using PrintWriter

This example show a how to use PrintWriter to print to System.out and file. PrintWriter prints formatted representations of objects to a text-output stream. We will use last example of "ProcessBuilder to create operating system processes" to get input from.

package java_processbuilder;

import java.io.File;
import java.io.FileWriter;
import java.io.IOException;
import java.io.InputStream;
import java.io.PrintWriter;
import java.util.logging.Level;
import java.util.logging.Logger;

/**
 *
 * @web java-buddy.blogspot.com
 */
public class Java_ProcessBuilder {

    public static void main(String[] args) {

        // Example to run "dir" in Windows
        String[] command = {"cmd", "/c", "dir"};
        StringBuilder cmdReturn = new StringBuilder();
        try {
            //print to System.out
            PrintWriter printWriter_out = new PrintWriter(System.out, true);
            
            //print to file, text.txt
            File file = new File("test.txt");
            file.createNewFile();
            try (PrintWriter printWriter_file = new PrintWriter(new FileWriter(file))) {
                ProcessBuilder processBuilder = new ProcessBuilder(command);
                Process process = processBuilder.start();
                
                try (InputStream inputStream = process.getInputStream()) {
                    int c;
                    while ((c = inputStream.read()) != -1) {
                        cmdReturn.append((char) c);
                    }
                }
                
                //System.out.println(cmdReturn.toString());
                printWriter_out.println(cmdReturn.toString());
                printWriter_file.println(cmdReturn.toString());
            }

        } catch (IOException ex) {
            Logger.getLogger(Java_ProcessBuilder.class.getName())
                    .log(Level.SEVERE, null, ex);
        }
    }
}

ProcessBuilder to create operating system processes

This example have the same result of last post "Runtime.getRuntime().exec()", but using ProcessBuilder.

ProcessBuilder to create operating system processes


package java_processbuilder;

import java.io.IOException;
import java.io.InputStream;
import java.util.logging.Level;
import java.util.logging.Logger;

/**
 *
 * @web java-buddy.blogspot.com
 */
public class Java_ProcessBuilder {

    public static void main(String[] args) {

        // Example to run "dir" in Windows
        String[] command = {"cmd", "/c", "dir"};
        StringBuilder cmdReturn = new StringBuilder();
        try {
            ProcessBuilder processBuilder = new ProcessBuilder(command);
            Process process = processBuilder.start();
            
            try (InputStream inputStream = process.getInputStream()) {
                int c;
                while ((c = inputStream.read()) != -1) {
                    cmdReturn.append((char) c);
                }
            }
            System.out.println(cmdReturn.toString());

        } catch (IOException ex) {
            Logger.getLogger(Java_ProcessBuilder.class.getName())
                    .log(Level.SEVERE, null, ex);
        }
        
    }
    
}


Execute system command from Java, using Runtime.getRuntime().exec()

This example demonstrate how to run system commnad ("dir" in Windows) from Java code, and read the output of the command, using Runtime.getRuntime().exec().

package java_process;

import java.io.IOException;
import java.io.InputStream;
import java.util.logging.Level;
import java.util.logging.Logger;

/**
 *
 * @web java-buddy.blogspot.com
 */
public class Java_Process {

    public static void main(String[] args) {

        // Example to run "dir" in Windows
        String[] command = {"cmd", "/c", "dir"};
        StringBuilder cmdReturn = new StringBuilder();
        try {
            Process process = Runtime.getRuntime().exec(command);
            try (InputStream inputStream = process.getInputStream()) {
                int c;
                while ((c = inputStream.read()) != -1) {
                    cmdReturn.append((char) c);
                }
            }
            System.out.println(cmdReturn.toString());

        } catch (IOException ex) {
            Logger.getLogger(Java_Process.class.getName())
                    .log(Level.SEVERE, null, ex);
        }
    }
}


Runtime.getRuntime().exec()
"dir" in Windows' cmd prompt
Related:
ProcessBuilder to create operating system processes

Tuesday, December 10, 2013

Learn Java online: Free interactive Java tutorial

Whether you are an experienced programmer or not, the website, LearnJavaOnline.org, is intended for everyone who wishes to learn the Java programming language.

LearnJavaOnline.org

Scene Builder is now open source, as a part of the OpenJFX project

Scene Builder is now open source, as a part of the OpenJFX project .

The whole Scene Builder functionality is provided, including the SB Kit API (designed for integration of SB features into third party tools) as well as the standalone SB application.
This code is made available under the terms of a BSD-style license, similar to JavaFX samples.
The only part of the product which remains closed is the native packaging/installer code.

Scene Builder source code is located in apps/scenebuilder/ in the OpenJFX repository .
Building and running the Scene Builder application from these sources can be done either of the following ways:
From NetBeans: open the SceneBuilderApp project and run it (you need a JDK 1.8 Java Platform configured)
From the command line: 
$ cd SceneBuilderApp
$ ant -Dplatforms.JDK_1.8.home=<path_to_JDK_home> run

source: https://forums.oracle.com/message/11290619

Sunday, December 8, 2013

File.getPath(), File.getAbsolutePath() and File.getCanonicalPath()

This example show how File.getCanonicalPath() different from getPath() and getAbsolutePath() in Linux to open soft-link file.


It is described in Java doc:
  • getPath() converts this abstract pathname into a pathname string.
    The resulting string uses the default name-separator character to separate the names in the name sequence.
  • getAbsolutePath() Returns the absolute pathname string of this abstract pathname.
    If this abstract pathname is already absolute, then the pathname string is simply returned as if by the getPath() method. If this abstract pathname is the empty abstract pathname then the pathname string of the current user directory, which is named by the system property user.dir, is returned. Otherwise this pathname is resolved in a system-dependent way. On UNIX systems, a relative pathname is made absolute by resolving it against the current user directory. On Microsoft Windows systems, a relative pathname is made absolute by resolving it against the current directory of the drive named by the pathname, if any; if not, it is resolved against the current user directory.
  • getCanonicalPath()
    Returns the canonical pathname string of this abstract pathname.
    A canonical pathname is both absolute and unique. The precise definition of canonical form is system-dependent. This method first converts this pathname to absolute form if necessary, as if by invoking the getAbsolutePath() method, and then maps it to its unique form in a system-dependent way. This typically involves removing redundant names such as "." and ".." from the pathname, resolving symbolic links (on UNIX platforms), and converting drive letters to a standard case (on Microsoft Windows platforms).
    Every pathname that denotes an existing file or directory has a unique canonical form. Every pathname that denotes a nonexistent file or directory also has a unique canonical form. The canonical form of the pathname of a nonexistent file or directory may be different from the canonical form of the same pathname after the file or directory is created. Similarly, the canonical form of the pathname of an existing file or directory may be different from the canonical form of the same pathname after the file or directory is deleted.
Enter the code to implement FileChooser of JavaFX to select file, then get its Path, Absolute Path and Canonical Path.
package javafx_filechooser;

import java.io.File;
import java.io.IOException;
import java.util.logging.Level;
import java.util.logging.Logger;
import javafx.application.Application;
import javafx.event.ActionEvent;
import javafx.event.EventHandler;
import javafx.scene.Scene;
import javafx.scene.control.Button;
import javafx.scene.control.Label;
import javafx.scene.layout.StackPane;
import javafx.scene.layout.VBox;
import javafx.stage.FileChooser;
import javafx.stage.Stage;

/**
 *
 * @web java-buddy.blogspot.com
 */
public class JavaFX_FileChooser extends Application {

    File file;

    @Override
    public void start(Stage primaryStage) {
        primaryStage.setTitle("Hello World!");

        final Label labelFile = new Label();

        Button btn = new Button();
        btn.setText("Open FileChooser'");
        btn.setOnAction(new EventHandler<ActionEvent>() {
            @Override
            public void handle(ActionEvent event) {
                FileChooser fileChooser = new FileChooser();

                //Set extension filter
                FileChooser.ExtensionFilter extFilter = new 
                        FileChooser.ExtensionFilter("ALL files (*.*)", "*.*");
                fileChooser.getExtensionFilters().add(extFilter);

                //Show open file dialog
                file = fileChooser.showOpenDialog(null);

                String pathsInfo = "";
                pathsInfo += "getPath(): " + file.getPath() + "\n";
                pathsInfo += "getAbsolutePath(): " + file.getAbsolutePath() + "\n";

                pathsInfo += (new File(file.getPath())).isAbsolute();

                try {
                    pathsInfo += "getCanonicalPath(): " + 
                            file.getCanonicalPath() + "\n";
                } catch (IOException ex) {
                    Logger.getLogger(JavaFX_FileChooser
                            .class.getName()).log(Level.SEVERE, null, ex);
                }

                labelFile.setText(pathsInfo);
            }
        });

        VBox vBox = new VBox();
        vBox.getChildren().addAll(btn, labelFile);

        StackPane root = new StackPane();
        root.getChildren().add(vBox);
        primaryStage.setScene(new Scene(root, 300, 250));
        primaryStage.show();
    }

    public static void main(String[] args) {
        launch(args);
    }
}