Showing posts with label how to. Show all posts

Sunday, November 8, 2015

Install Netbeans 8.1 0n Ubuntu 15.10

Netbeans IDE 8.1 just released.

This video show how to download and install Netbeans IDE 8.1 on Ubuntu-GNOME 15.10


To install Ubuntu 8.1 on Ubuntu:
- Visit https://netbeans.org/ to download installer-file.
- chmod +x <installer-file-name>.
- run it with command:
./<installer-file-name> to run the installer.

The only special is to select correct path to JDK, 1:40 in the above video.

My JDK was installed with ppa:webupd8team, it's on "/usr/lib/jvm/java-8-oracle".


If you missed the setting JDK path, you still run edit netbeans.conf, to specify netbeans_jdkhome, or run netbeans with --jdkhome option. (ref: http://wiki.netbeans.org/FaqRunningOnJre)

netbeans.conf to set netbeans_jdkhome:


run netbeans with --jdkhome option:


Saturday, August 29, 2015

Install NetBeans IDE on Windows 10

This video show how to install NetBeans IDE (currently 8.0.2) on Microsoft Windows 10.


To download NetBeans IDE, visit https://netbeans.org/


Friday, August 28, 2015

Install JDK 8 on Windows 10, and set Path

Browse to Oracle Java SE Downloads (http://www.oracle.com/technetwork/java/javase/downloads/index.html) to download the latest JDK.


Check the option to Accept License Agreement, and select the download file. "jdk-8u60-windows-x64.exe" in my case.


Run the downloaded file after download completed. And follow the steps.


After installed JDK, you have to set Path to it.

To set path, search "Environment Variables", click "Edit the system environment variables".

Click on "Environment Variables..."

Select and edit Path

Add the  path of the bin folder of your JDK, "C:\Program Files\Java\jdk1.8.0_60\bin" in my case.


After path set, you can run javac in command prompt.

Saturday, July 4, 2015

javap - Java Class Disassembler

javap is a command line Java Class Disassembler. It disassembles one or more class files. Its output depends on the options used. If no options are used, javap prints out the package, protected, and public fields and methods of the classes passed to it. javap prints its output to stdout.


Wednesday, February 5, 2014

Migration to JDK 8

Smart Migration to JDK 8

A thorough guide to the key features of language enhancements in Java 8, especially lambdas, functional operations, and method references.

Sunday, December 22, 2013

Simple steps to generate and run jar

It is simple steps to generate hello.jar from hello.java (with main() method) using javac and jar, then run the jar using java.
Simple steps to generate and run jar
  • Compile with javac to generate class file:

    javac hello.java
  • Generate jar file using jar:

    jar cf hello.jar hello.class

    option c - create a JAR file.
    option f - output to a file.
    hello.jar is the output file name
    last argument(s) can be more than one file that you want to include in your JAR file.
  • Run the jar using java:

    java -cf hello.jar hello

    -cf specify the classpath of hello.jar.
    hello is the class contains the main method.

Tuesday, December 3, 2013

Deploying JavaFX Applications in Self-Contained Packaging

A self-contained application is a wrapper for JavaFX application, making it independent of what the user might have installed.

- First of all, new a JavaFX Application as normal.

- Copy the below code (original from JavaFX Documentation) to build.xml in your project folder.
     <target name="-post-jfx-deploy">
       <fx:deploy width="${javafx.run.width}" height="${javafx.run.height}" 
                  nativeBundles="all"
                  outdir="${basedir}/${dist.dir}" outfile="${application.title}">
          <fx:application name="${application.title}" 
                          mainClass="${javafx.main.class}"/>
          <fx:resources>
              <fx:fileset dir="${basedir}/${dist.dir}"
                          includes="*.jar"/>
          </fx:resources>
          <fx:info title="${application.title}" 
                   vendor="${application.vendor}"/>
        </fx:deploy>          
     </target>


By specifying nativeBundles="all", it will produces all applicable self-contained application packages.

- Finally, your build.xml will like this:

<?xml version="1.0" encoding="UTF-8"?><!-- You may freely edit this file. See commented blocks below for --><!-- some examples of how to customize the build. --><!-- (If you delete it and reopen the project it will be recreated.) --><!-- By default, only the Clean and Build commands use this build script. --><project name="JavaFXHello" default="default" basedir="." xmlns:fx="javafx:com.sun.javafx.tools.ant">
    <description>Builds, tests, and runs the project JavaFXHello.</description>
    <import file="nbproject/build-impl.xml"/>
    <!--

    There exist several targets which are by default empty and which can be 
    used for execution of your tasks. These targets are usually executed 
    before and after some main targets. Those of them relevant for JavaFX project are: 

      -pre-init:                 called before initialization of project properties
      -post-init:                called after initialization of project properties
      -pre-compile:              called before javac compilation
      -post-compile:             called after javac compilation
      -pre-compile-test:         called before javac compilation of JUnit tests
      -post-compile-test:        called after javac compilation of JUnit tests
      -pre-jfx-jar:              called before FX SDK specific <fx:jar> task
      -post-jfx-jar:             called after FX SDK specific <fx:jar> task
      -pre-jfx-deploy:           called before FX SDK specific <fx:deploy> task
      -post-jfx-deploy:          called after FX SDK specific <fx:deploy> task
      -pre-jfx-native:           called just after -pre-jfx-deploy if <fx:deploy> runs in native packaging mode
      -post-jfx-native:          called just after -post-jfx-deploy if <fx:deploy> runs in native packaging mode
      -post-clean:               called after cleaning build products

    (Targets beginning with '-' are not intended to be called on their own.)

    Example of inserting a HTML postprocessor after javaFX SDK deployment:

        <target name="-post-jfx-deploy">
            <basename property="jfx.deployment.base" file="${jfx.deployment.jar}" suffix=".jar"/>
            <property name="jfx.deployment.html" location="${jfx.deployment.dir}${file.separator}${jfx.deployment.base}.html"/>
            <custompostprocess>
                <fileset dir="${jfx.deployment.html}"/>
            </custompostprocess>
        </target>

    Example of calling an Ant task from JavaFX SDK. Note that access to JavaFX SDK Ant tasks must be
    initialized; to ensure this is done add the dependence on -check-jfx-sdk-version target:

        <target name="-post-jfx-jar" depends="-check-jfx-sdk-version">
            <echo message="Calling jar task from JavaFX SDK"/>
            <fx:jar ...>
                ...
            </fx:jar>
        </target>

    For more details about JavaFX SDK Ant tasks go to
    http://docs.oracle.com/javafx/2/deployment/jfxpub-deployment.htm

    For list of available properties check the files
    nbproject/build-impl.xml and nbproject/jfx-impl.xml.

    -->
 <target name="-post-jfx-deploy">
       <fx:deploy width="${javafx.run.width}" height="${javafx.run.height}" 
                  nativeBundles="all"
                  outdir="${basedir}/${dist.dir}" outfile="${application.title}">
          <fx:application name="${application.title}" 
                          mainClass="${javafx.main.class}"/>
          <fx:resources>
              <fx:fileset dir="${basedir}/${dist.dir}"
                          includes="*.jar"/>
          </fx:resources>
          <fx:info title="${application.title}" 
                   vendor="${application.vendor}"/>
        </fx:deploy>          
     </target>
</project>


- Clean and Build Project again. JavaFXHello/dist/bundles/ folder will be created. In my system there is a folder with stand alone package, and a deb installable package.


Reference: http://docs.oracle.com/javafx/2/deployment/self-contained-packaging.htm

Saturday, November 30, 2013

Run Netbeans generated jar of Java program as stand alone program and create desktop shortcut

To run Netbeans generated jar in Windows cmd prompt:

Click Run > Clean and Build Project. In Output window wil show you how to run this application from the command line without Ant.


You can open cmd prompt and copy the command to run it as stand alone program.


Related:
Run the Nerbeans generated jar of JavaFX application as stand alone program

Run the Nerbeans generated jar of JavaFX application as stand alone program

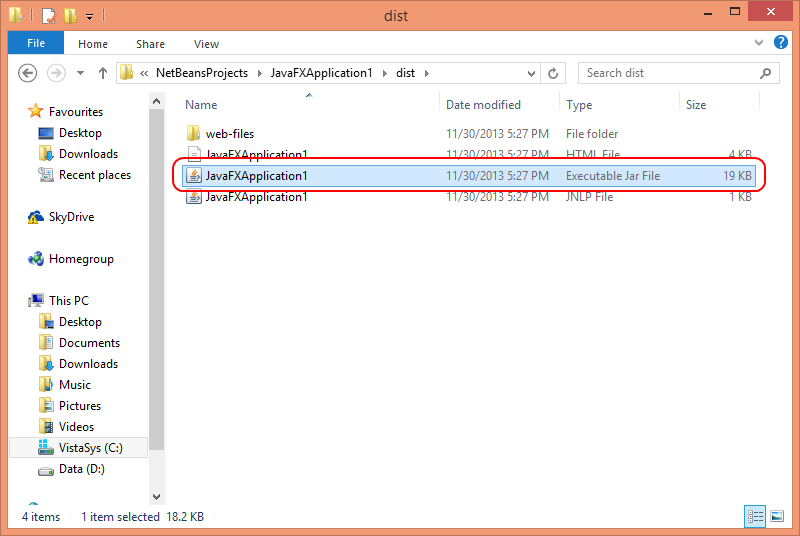
To run the jar generated by Netbeans IDE, we have to locate the target folder. Click Run in Netbeans IDE > Clean and Build Project. Once BUILD SUCCESSFUL, the Created dir will be shown on Output window.


Open File Manager and open the created dir. You can find a Executable Jar file.


You can run it by double clicking. And also you can create desktop shortcut of it.


Related: - Run Netbeans generated jar of Java program as stand alone program and create desktop shortcut

Monday, September 2, 2013

Set memory option for JVM

The -J-Xmx... option tells the Java virtual machine the maximum amount of memory it should use for the heap. Placing a hard upper limit on this number means that the Java process cannot consume more memory than physical RAM available. This limit can be raised on systems with more memory. Current default value is 128MB. Note: Do not set this value to near or greater than the amount of physical RAM in your system or it will cause severe swapping during runtime.

~ details: https://performance.netbeans.org/howto/jvmswitches/

To set -Xmx option in Netbeans:

- Right click project, select Properties.


- Select Run tab, enter your setting in VM Options.


The option -Xmx1g request 1G of maximum memory for JVM. Run the example code in last post to varify.


Wednesday, July 24, 2013

Add JAR in NetBeans

This post describe how to add third party Jar in NetBeans.

Download target JAR. For example, download java-json here, unzip it.

In NetBeans, right click your project, select Properties.


Select Category of Libraries, Compile tab, and click Add JAR/Folder button.


Browse to select the downloaded/unzipped jar file, click OK.


And click OK to finish.


Tuesday, July 23, 2013

Setting up NetBeans IDE for Mobile Development on Windows

Setting up NetBeans IDE for Mobile Development on Windows

This screencast demonstrates the support for the Java ME SDK in NetBeans IDE, showing how to activate JavaME plugins and register the Java ME SDK in the IDE.

Sunday, June 23, 2013

Setup RxTx jar and .so for Ubuntu

The former post describe how to "Install RXTX on Ubuntu". It simple download the files to your system, but Java not know where is it! To work with installed RxTx, you have to setup Build Path to compile the code, and copy the binaries (.so files) to java library path.

Setup Java Build Path in NetBeans:

If build path not set correctly, error of "package gnu.io does not exist" will be thrown.

package gnu.io does not exist
"package gnu.io does not exist" thrown without Build Path set
- Right click your project, select Properties.

Setup project properties
- Select Libraries in Categories, Compiler tab and click Add JAR/Folder button.

Add JAR/Folder
Add JAR/Folder
- Browse to select RXTXcomm.jar, should be in /usr/share/java folder, and click OK to accept.

Add RXTXcomm.jar
Add RXTXcomm.jar
- Click OK again to finish. It should be compiled without error.

Copy the binaries (.so files) to java library path:

Without corresponding .so files in java library path, you will get error of "UnsatisfiedLinkError: no rxtxSerial in java.library.path" in run time, like this:

java.lang.UnsatisfiedLinkError: no rxtxSerial in java.library.path thrown while loading gnu.io.RXTXCommDriver
Exception in thread "main" java.lang.UnsatisfiedLinkError: no rxtxSerial in java.library.path
at java.lang.ClassLoader.loadLibrary(ClassLoader.java:1878)
at java.lang.Runtime.loadLibrary0(Runtime.java:849)
at java.lang.System.loadLibrary(System.java:1087)
at gnu.io.CommPortIdentifier.<clinit>(CommPortIdentifier.java:123)
at serialtest.SerialTest.initialize(SerialTest.java:41)
at serialtest.SerialTest.main(SerialTest.java:109)

UnsatisfiedLinkError

- Refer to the post "Get property of java library path" to know where is the library folder.

- Copy the binaries librxtxSerial.so and librxtxParallel.so (should be in /usr/lib/jni/) to one of the library folder (for example: /opt/java/jre/lib/i386/).

$sudo cp /usr/lib/jni/librxtxSerial.so /opt/java/jre/lib/i386/librxtxSerial.so
$sudo cp /usr/lib/jni/librxtxParallel.so /opt/java/jre/lib/i386/librxtxParallel.so


Saturday, June 22, 2013

Install RXTX on Ubuntu

RXTX is a full implementation of the Java CommAPI from Sun. It contains native libraries providing serial and parallel communication for the Java Development Toolkit.

A easy way to install RXTX on Ubuntu is using Synaptic Package Manager (Synaptic Package Manager is available in Ubuntu Software Center).

Simple search rxtx in Synaptic Package Manager, and mark to install

Install RxTx on Ubuntu with Synaptic Package Manager

The jars will be installed in /usr/share/java folder.

- Alternatively, you can use the command in Terminal:
$sudo apt-get install librxtx-java

Remark: It copy the files only. To make it work with Java, you have to "Setup RxTx jar and .so for Ubuntu".


Wednesday, March 20, 2013

Setting up your Java Dev Environment


YouTube Developers Live: Setting up your Java Dev Environment

Want to learn how to setup your IDE and Maven for YouTube API Java development? Join +Ikai Lan and +Ibrahim Ulukaya as they start from scratch and end up with a productive YouTube API Java development environment.

They will cover IDE setup, Maven integration and go over Java code samples of the YouTube Data API v3. Whether you are an experienced developer working through initial YouTube API library setup or a new developer ready to get started, this show will be great DIY guide!


Tuesday, March 5, 2013

Building OpenJFX on Mac with JDK


Building OpenJFX on Mac with JDK b78
Step by step instructions (with some gotcha's!) in building OpenJFX on Mac OS X with JDK b78

Tuesday, February 12, 2013

Obtain API Key for Google Maps API v3

All Maps API applications* should load the Maps API using an API key ~ https://developers.google.com/maps/documentation/javascript/tutorial.

The steps are shown here:

- Visit Google APIs Console (you have to login with your Google account).


- Create a new API Project.


- Enter the name to your project.


- Enable the Google Maps API V3.


- Accept these terms.


- Make sure to select the Project in the left, and select API Access, you can copy the API Key to your application.


Related article:
- Embed Google Maps API v3 in JavaFX WebView.

Friday, February 1, 2013

How to remove JDK in Ubuntu Linux

Java SE 7 Update 13 released, so I have to remove old jdk and install the updated version.

To remove jdk using update-alternatives, open Terminal and type the commands:

sudo update-alternatives --remove "javac" "/home/you/jdk1.7.0_11/bin/javac"
sudo update-alternatives --remove "java" "/home/you/jdk1.7.0_11/bin/java"

remove JDK in Ubuntu Linux

After remove the old jdk, you can remove the old jdk from your hardisk, and re-install the new JDK 7 and update-alternatives.

Wednesday, January 16, 2013

Install Netbeans IDE 7.2 on release version Windows 8

TO download Netbeans, visit http://netbeans.org/, click the Download button.


Scroll download the select the download option. Java SE in my case.


Run the download file, netbeans-7.2.1-ml-javase-windows.exe.


Click Next to start installation.


Accept the terms in the license agreement, and click Next.


Accept the terms t install JUnit, and click Next.


Select the location to install. The installer will search te installed JDK if exist. Next.


Review all the setting, and click Install.


Finish.


How to run Java Control Panel on Windows 8

To run Java Control Panel on Windows 8, search java in Settings.

Search Java Control Panel in Settings

Java Control Panel