Showing posts with label NetBeans. Show all posts

Sunday, November 8, 2015

Install Netbeans 8.1 0n Ubuntu 15.10

Netbeans IDE 8.1 just released.

This video show how to download and install Netbeans IDE 8.1 on Ubuntu-GNOME 15.10


To install Ubuntu 8.1 on Ubuntu:
- Visit https://netbeans.org/ to download installer-file.
- chmod +x <installer-file-name>.
- run it with command:
./<installer-file-name> to run the installer.

The only special is to select correct path to JDK, 1:40 in the above video.

My JDK was installed with ppa:webupd8team, it's on "/usr/lib/jvm/java-8-oracle".


If you missed the setting JDK path, you still run edit netbeans.conf, to specify netbeans_jdkhome, or run netbeans with --jdkhome option. (ref: http://wiki.netbeans.org/FaqRunningOnJre)

netbeans.conf to set netbeans_jdkhome:


run netbeans with --jdkhome option:


Thursday, October 29, 2015

Install Netbeans IDE on Ubuntu GNOME 15.10

Before install Netbeans IDE, install JDK8 first.

Follow the video to install Netbeans IDE on Ubuntu GNOME 15.10:


Try a example in Netbeans IDE:

Monday, October 5, 2015

Remote run JavaFX on Raspbian Jessie, from Netbeans/Windows 10

Raspbian Jessie is a new major upgrade of official Raspberry Pi OS. This video show how to create Remote Java SE Platform on Netbeans IDE running under Windows 10, deploy JavaFX application remotely to Raspberry Pi running Raspbian Jessie.


Source: Remote run JavaFX on Raspbian Jessie, from Netbeans/Windows 10

Sunday, September 6, 2015

Mastering NetBeans

Master building complex applications with NetBeans to become more proficient programmers


About This Book
  • Customize NetBeans to fit your unique needs
  • Excel in NetBeans IDE, learning the shortcuts and hidden features to become more productive
  • A comprehensive guide to become more productive at application development using NetBeans IDE
Who This Book Is For
If you are a competent developer who wants to fast-track your application development with NetBeans IDE, then this book is for you. Reasonable knowledge and an understanding of Java programming and NetBeans IDE is assumed.

What You Will Learn
  • Install NetBeans either from a distribution package or from source code
  • Test, debug, and run production code using the NetBeans IDE
  • Use external services such as PaaS environments and web services
  • Create desktop applications using Swing tools
  • Manage and configure relational databases
  • Build a Java business model and web tiers using Java EE and Spring technologies
  • Explore web services both with XML and RESTful approaches
  • Handle external services such as databases , Maven repositories, and cloud providers
  • Extend NetBeans for those situations where you require more from your IDE
In Detail
With the increasing complexity of software development and the abundance of tools available, learning your IDE in-depth will instantly increase your developer productivity. NetBeans is the only IDE that can be downloaded with Java itself and provides you with many cutting edge features not readily available with many IDEs. The IDE also provides a great set of tools for PHP and C/C++ developers. It is free and open source and has a large community of users and developers around the world.

This book will teach you to ace NetBeans IDE and make use of it in creating Java business and web services. It will help you to become a proficient developer and use NetBeans for software development. You will learn effective third-party interaction and enable yourself for productive database development.

Moving on, you will see how to create EJB projects and write effective and efficient web applications. Then you will learn how to use Swing and manage and configure a relational database. By the end of the book, you will be able to handle external services such as databases, Maven repositories, and cloud providers, and extend your NetBeans when you require more from your IDE.

Style and approach
An easy-to-follow yet comprehensive guide to help you master the exhaustive range of NetBeans features in order to become more efficient at Java programing. More advanced topics are covered in each chapter, with subjects grouped according to their complexity as well as their utility.

Saturday, August 29, 2015

Install NetBeans IDE on Windows 10

This video show how to install NetBeans IDE (currently 8.0.2) on Microsoft Windows 10.


To download NetBeans IDE, visit https://netbeans.org/


Tuesday, April 21, 2015

NetBeans IDE 8 Cookbook


NetBeans IDE 8 Cookbook

Over 75 practical recipes to maximize your productivity with NetBeans

About This Book
  • Increase developer productivity using features like refactoring and code creation
  • Test applications effectively using JUnit, TestNG and Arquilian
  • A recipe based guide filled with practical examples to help you create robust applications using NetBeans
Who This Book Is For
If you're a Java developer of any level using NetBeans and want to learn how to get the most out of NetBeans, then this book is for you. Learning how to utilize NetBeans will provide a firm foundation for your Java application development.

In Detail
From the start to the end of a Java project's lifecycle, this book will show you how to perform many key tasks with the NetBeans IDE, uncovering more about mobile, desktop, and enterprise Java along the way.

You will start by creating Java projects and learning how to refactor and use NetBeans tools to increase developer efficiency. You will then get a walkthrough of how to create a desktop application before covering JavaFX and mobile applications and how to use external services within them. Having seen how to create many different types of applications, you will then be shown how to test and profile them before storing them in revision control systems such as Git or Subversion. Finally,you will learn how to extend NetBeans itself by adding new features to the IDE.

Friday, September 19, 2014

JavaFX Rich Client Programming on the NetBeans Platform

JavaFX Rich Client Programming on the NetBeans Platform

JavaFX is a state-of-the-art graphics toolkit that is now built into Java and can be easily integrated with the NetBeans Platform. With JavaFX, you can create advanced user interfaces, manipulate media, generate graphical effects and animations, and much more. The NetBeans Platform provides a framework for building robust, modular applications with long life expectancies. Together, JavaFX and the NetBeans Platform provide the basis for creating visually appealing, industrial-strength applications.

Focusing on JavaFX as the front end for rich client applications, this guide’s examples cover JavaFX 8 with the NetBeans Platform, NetBeans IDE, and Java 8. Gail and Paul Anderson fully explain JavaFX and its relationship with the NetBeans Platform architecture, and systematically show Java developers how to use them together effectively. Each concept and technique is supported by clearly written code examples, proven through extensive classroom teaching.

Coverage includes
  • Background basics with Java, JavaFX, and UI events
  • Building loosely coupled applications
  • NetBeans Platform Modules and Lookup
  • NetBeans Platform Nodes, Explorer Views, and Actions
  • Building CRUD-based applications
  • Integrating JavaFX with a Swing-based framework
  • Using JavaFX Charts with the NetBeans Platform
  • Using the NetBeans Platform File System and Data System
  • Keeping the UI responsive

Tuesday, March 18, 2014

Java SE 8 released

Java SE 8 contains several new features and enhancements that increase the performance of existing applications, make it easier to develop applications for modern platforms, and increase maintainability of code.

Download Java Platform (JDK) 8 or JDK 8 & NetBeans 8.0 HERE.

Saturday, February 8, 2014

NetBeans IDE 8.0 Beta, working with Java 8

NetBeans IDE 8.0 Beta provides out-of-the-box code analyzers and editors for working with the latest Java 8 technologies--Java SE 8, Java SE Embedded 8, and Java ME Embedded 8. The IDE also has a range of new enhancements that further improve its support for Maven and Java EE with PrimeFaces; new tools for HTML5, in particular for AngularJS; and improvements to PHP and C/C++ support.

https://netbeans.org/community/releases/80/

Monday, December 16, 2013

NetBeans IDE 7.4 Patch 2 Now Available

An update notification will appear in the NetBeans IDE 7.4.
Click the notification to install the updates.
(You can also download the fixes through the NetBeans IDE Plugin Manager.)

source: https://netbeans.org/community/news/show/1605.html

Tuesday, December 3, 2013

Deploying JavaFX Applications in Self-Contained Packaging

A self-contained application is a wrapper for JavaFX application, making it independent of what the user might have installed.

- First of all, new a JavaFX Application as normal.

- Copy the below code (original from JavaFX Documentation) to build.xml in your project folder.
     <target name="-post-jfx-deploy">
       <fx:deploy width="${javafx.run.width}" height="${javafx.run.height}" 
                  nativeBundles="all"
                  outdir="${basedir}/${dist.dir}" outfile="${application.title}">
          <fx:application name="${application.title}" 
                          mainClass="${javafx.main.class}"/>
          <fx:resources>
              <fx:fileset dir="${basedir}/${dist.dir}"
                          includes="*.jar"/>
          </fx:resources>
          <fx:info title="${application.title}" 
                   vendor="${application.vendor}"/>
        </fx:deploy>          
     </target>


By specifying nativeBundles="all", it will produces all applicable self-contained application packages.

- Finally, your build.xml will like this:

<?xml version="1.0" encoding="UTF-8"?><!-- You may freely edit this file. See commented blocks below for --><!-- some examples of how to customize the build. --><!-- (If you delete it and reopen the project it will be recreated.) --><!-- By default, only the Clean and Build commands use this build script. --><project name="JavaFXHello" default="default" basedir="." xmlns:fx="javafx:com.sun.javafx.tools.ant">
    <description>Builds, tests, and runs the project JavaFXHello.</description>
    <import file="nbproject/build-impl.xml"/>
    <!--

    There exist several targets which are by default empty and which can be 
    used for execution of your tasks. These targets are usually executed 
    before and after some main targets. Those of them relevant for JavaFX project are: 

      -pre-init:                 called before initialization of project properties
      -post-init:                called after initialization of project properties
      -pre-compile:              called before javac compilation
      -post-compile:             called after javac compilation
      -pre-compile-test:         called before javac compilation of JUnit tests
      -post-compile-test:        called after javac compilation of JUnit tests
      -pre-jfx-jar:              called before FX SDK specific <fx:jar> task
      -post-jfx-jar:             called after FX SDK specific <fx:jar> task
      -pre-jfx-deploy:           called before FX SDK specific <fx:deploy> task
      -post-jfx-deploy:          called after FX SDK specific <fx:deploy> task
      -pre-jfx-native:           called just after -pre-jfx-deploy if <fx:deploy> runs in native packaging mode
      -post-jfx-native:          called just after -post-jfx-deploy if <fx:deploy> runs in native packaging mode
      -post-clean:               called after cleaning build products

    (Targets beginning with '-' are not intended to be called on their own.)

    Example of inserting a HTML postprocessor after javaFX SDK deployment:

        <target name="-post-jfx-deploy">
            <basename property="jfx.deployment.base" file="${jfx.deployment.jar}" suffix=".jar"/>
            <property name="jfx.deployment.html" location="${jfx.deployment.dir}${file.separator}${jfx.deployment.base}.html"/>
            <custompostprocess>
                <fileset dir="${jfx.deployment.html}"/>
            </custompostprocess>
        </target>

    Example of calling an Ant task from JavaFX SDK. Note that access to JavaFX SDK Ant tasks must be
    initialized; to ensure this is done add the dependence on -check-jfx-sdk-version target:

        <target name="-post-jfx-jar" depends="-check-jfx-sdk-version">
            <echo message="Calling jar task from JavaFX SDK"/>
            <fx:jar ...>
                ...
            </fx:jar>
        </target>

    For more details about JavaFX SDK Ant tasks go to
    http://docs.oracle.com/javafx/2/deployment/jfxpub-deployment.htm

    For list of available properties check the files
    nbproject/build-impl.xml and nbproject/jfx-impl.xml.

    -->
 <target name="-post-jfx-deploy">
       <fx:deploy width="${javafx.run.width}" height="${javafx.run.height}" 
                  nativeBundles="all"
                  outdir="${basedir}/${dist.dir}" outfile="${application.title}">
          <fx:application name="${application.title}" 
                          mainClass="${javafx.main.class}"/>
          <fx:resources>
              <fx:fileset dir="${basedir}/${dist.dir}"
                          includes="*.jar"/>
          </fx:resources>
          <fx:info title="${application.title}" 
                   vendor="${application.vendor}"/>
        </fx:deploy>          
     </target>
</project>


- Clean and Build Project again. JavaFXHello/dist/bundles/ folder will be created. In my system there is a folder with stand alone package, and a deb installable package.


Reference: http://docs.oracle.com/javafx/2/deployment/self-contained-packaging.htm

Saturday, November 30, 2013

Run Netbeans generated jar of Java program as stand alone program and create desktop shortcut

To run Netbeans generated jar in Windows cmd prompt:

Click Run > Clean and Build Project. In Output window wil show you how to run this application from the command line without Ant.


You can open cmd prompt and copy the command to run it as stand alone program.


Related:
Run the Nerbeans generated jar of JavaFX application as stand alone program

Run the Nerbeans generated jar of JavaFX application as stand alone program

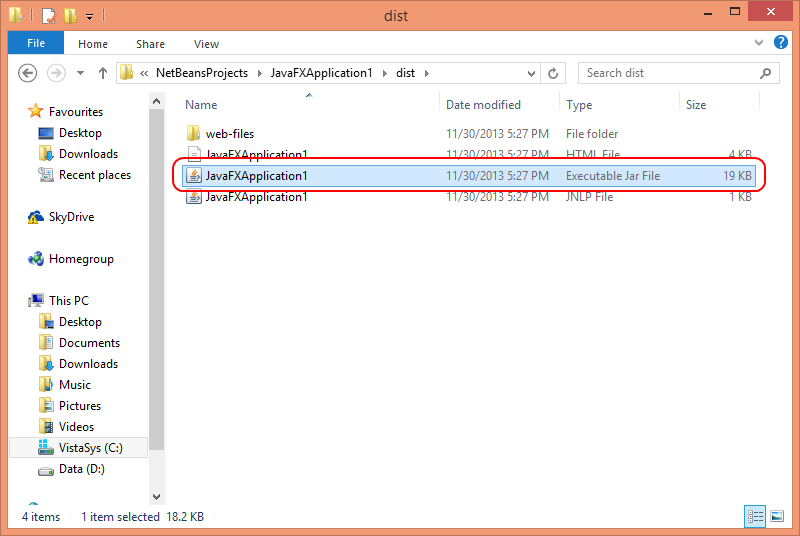
To run the jar generated by Netbeans IDE, we have to locate the target folder. Click Run in Netbeans IDE > Clean and Build Project. Once BUILD SUCCESSFUL, the Created dir will be shown on Output window.


Open File Manager and open the created dir. You can find a Executable Jar file.


You can run it by double clicking. And also you can create desktop shortcut of it.


Related: - Run Netbeans generated jar of Java program as stand alone program and create desktop shortcut

Thursday, October 17, 2013

JDK 8 in NetBeans IDE 7.4

This screencast demonstrates how to set up NetBeans IDE 7.4 to use JDK 8, together with how to use JDK 8 profile support and lambda expressions.

NetBeans IDE 7.4

NetBeans IDE 7.4 extends the advanced HTML5 development support introduced in NetBeans IDE 7.3 to Java EE and PHP application development, while offering new support for hybrid HTML5 application development on the Android and iOS platforms. In addition, this release provides support for working with preview versions of JDK 8, and includes continued enhancements to JavaFX, C/C++ and more.

NetBeans IDE 7.4 is available in English, Brazilian Portuguese, Japanese, Russian, and Simplified Chinese.

Download NetBeans IDE 7.4

Monday, September 2, 2013

Set memory option for JVM

The -J-Xmx... option tells the Java virtual machine the maximum amount of memory it should use for the heap. Placing a hard upper limit on this number means that the Java process cannot consume more memory than physical RAM available. This limit can be raised on systems with more memory. Current default value is 128MB. Note: Do not set this value to near or greater than the amount of physical RAM in your system or it will cause severe swapping during runtime.

~ details: https://performance.netbeans.org/howto/jvmswitches/

To set -Xmx option in Netbeans:

- Right click project, select Properties.


- Select Run tab, enter your setting in VM Options.


The option -Xmx1g request 1G of maximum memory for JVM. Run the example code in last post to varify.