Thursday, January 29, 2015

The Java Tutorial: A Short Course on the Basics (6th Edition)


The Java Tutorial: A Short Course on the Basics (6th Edition) (Java Series), is based on the Java Platform, Standard Edition (Java SE) 8. This revised and updated edition introduces the new features added to the platform, including lambda expressions, default methods, aggregate operations, and more. An accessible and practical guide for programmers of any level, this book focuses on how to use the rich environment provided by Java to build applications, applets, and components.

Expanded coverage includes a chapter on the Date-Time API and a new chapter on annotations, with sections on type annotations and pluggable type systems as well as repeating annotations.

In addition, the updated sections “Security in Rich Internet Applications” and “Guidelines for Securing Rich Internet Applications” address key security topics. The latest deployment best practices are described in the chapter “Deployment in Depth.”

If you plan to take one of the Java SE 8 certification exams, this book can help. A special appendix, “Preparing for Java Programming Language Certification,” details the items covered on the available exams. Check online for updates.

All of the material has been thoroughly reviewed by members of Oracle Java engineering to ensure that the information is accurate and up to date. This book is based on the online tutorial hosted on Oracle Corporation’s website at http://docs.oracle.com/javase/tutorial.

Tuesday, January 27, 2015

Java HttpServer to download image

The example implement HttpServer to download image.


package java_httpserver;

import com.sun.net.httpserver.Headers;
import com.sun.net.httpserver.HttpExchange;
import com.sun.net.httpserver.HttpHandler;
import com.sun.net.httpserver.HttpServer;
import java.io.BufferedInputStream;
import java.io.File;
import java.io.FileInputStream;
import java.io.IOException;
import java.io.OutputStream;
import java.net.InetSocketAddress;
import java.util.logging.Level;
import java.util.logging.Logger;

/**
 *
 * @web http://java-buddy.blogspot.com/
 */
public class Java_HttpServer {
    
    static final int responseCode_OK = 200;

    public static void main(String[] args) {
        try {
            HttpServer httpServer = HttpServer.create(new InetSocketAddress(8000), 0);
            httpServer.createContext("/", new MyHttpHandler());
            httpServer.createContext("/image", new GetHttpHandler());
            httpServer.setExecutor(null);
            httpServer.start();
        } catch (IOException ex) {
            Logger.getLogger(Java_HttpServer.class.getName()).log(Level.SEVERE, null, ex);
        }
    }
    
    static class MyHttpHandler implements HttpHandler{

        @Override
        public void handle(HttpExchange he) throws IOException {
            
            String response = "Hello from java-buddy";
            he.sendResponseHeaders(responseCode_OK, response.length());
            
            OutputStream outputStream = he.getResponseBody();
            outputStream.write(response.getBytes());
            outputStream.close();
        }
    }
    
    static class GetHttpHandler implements HttpHandler{

        @Override
        public void handle(HttpExchange he) throws IOException {

            Headers headers = he.getResponseHeaders();
            headers.add("Content-Type", "image/png");
            
            File file = new File ("duke.png");
            byte[] bytes  = new byte [(int)file.length()];
            System.out.println(file.getAbsolutePath());
            System.out.println("length:" + file.length());
            
            FileInputStream fileInputStream = new FileInputStream(file);
            BufferedInputStream bufferedInputStream = new BufferedInputStream(fileInputStream);
            bufferedInputStream.read(bytes, 0, bytes.length);

            he.sendResponseHeaders(responseCode_OK, file.length());
            OutputStream outputStream = he.getResponseBody();
            outputStream.write(bytes, 0, bytes.length);
            outputStream.close();
        }
    }
    
}

Simple example of Java HttpServer

com.sun.net.httpserver.HttpServer  implements a simple HTTP server. A HttpServer is bound to an IP address and port number and listens for incoming TCP connections from clients on this address.


It's a simple example of using HttpServer.
package java_httpserver;

import com.sun.net.httpserver.HttpExchange;
import com.sun.net.httpserver.HttpHandler;
import com.sun.net.httpserver.HttpServer;
import java.io.IOException;
import java.io.OutputStream;
import java.net.InetSocketAddress;
import java.util.logging.Level;
import java.util.logging.Logger;

/**
 *
 * @web http://java-buddy.blogspot.com/
 */
public class Java_HttpServer {

    public static void main(String[] args) {
        try {
            HttpServer httpServer = HttpServer.create(new InetSocketAddress(8000), 0);
            httpServer.createContext("/", new MyHttpHandler());
            httpServer.setExecutor(null);
            httpServer.start();
        } catch (IOException ex) {
            Logger.getLogger(Java_HttpServer.class.getName()).log(Level.SEVERE, null, ex);
        }
    }
    
    static class MyHttpHandler implements HttpHandler{

        @Override
        public void handle(HttpExchange he) throws IOException {
            int responseCode_OK = 200;
            String response = "Hello from java-buddy";
            he.sendResponseHeaders(responseCode_OK, response.length());
            
            OutputStream outputStream = he.getResponseBody();
            outputStream.write(response.getBytes());
            outputStream.close();
            
            //try-with-resources form
            /*
            try (OutputStream outputStream = he.getResponseBody()) {
                outputStream.write(response.getBytes());
            }
            */

        }
        
    }
    
}

To access the server, open a browser and visit: http://localhost:8000/


Next example show how to implement HttpServer to download image.

Saturday, January 24, 2015

Java example to copy file

This example show copy file in Java, with JavaFX interface.


package javafx_copyfile;

import java.io.File;
import java.io.FileInputStream;
import java.io.FileNotFoundException;
import java.io.FileOutputStream;
import java.io.IOException;
import java.io.InputStream;
import java.io.OutputStream;
import java.util.logging.Level;
import java.util.logging.Logger;
import javafx.application.Application;
import javafx.event.ActionEvent;
import javafx.scene.Scene;
import javafx.scene.control.Button;
import javafx.scene.control.Label;
import javafx.scene.layout.StackPane;
import javafx.scene.layout.VBox;
import javafx.stage.FileChooser;
import javafx.stage.Stage;

/**
 *
 * @web http://java-buddy.blogspot.com/
 */
public class JavaFX_CopyFile extends Application {

    File srcFile, destFile;

    @Override
    public void start(Stage primaryStage) {

        FileChooser openFileChooser = new FileChooser();
        FileChooser saveFileChooser = new FileChooser();
        File openFile;
        File saveFile;

        Button btnOpenFile = new Button("Open File");
        Label labelOpenFile = new Label();
        Button btnSaveFile = new Button("Save File");
        Label labelSaveFile = new Label();
        Button btnCopyFile = new Button("Copy File...");

        btnOpenFile.setOnAction((ActionEvent event) -> {
            File file = openFileChooser.showOpenDialog(null);
            if (file != null) {
                srcFile = file;
                labelOpenFile.setText(srcFile.getName());
            }
        });

        btnSaveFile.setOnAction((ActionEvent event) -> {
            File file = openFileChooser.showSaveDialog(null);
            if (file != null) {
                destFile = file;
                labelSaveFile.setText(destFile.getName());
            }
        });

        btnCopyFile.setOnAction((ActionEvent event) -> {
            if (srcFile != null && destFile != null) {
                copyFile(srcFile, destFile);
            }
        });

        VBox vBox = new VBox();
        vBox.getChildren().addAll(btnOpenFile, labelOpenFile,
                btnSaveFile, labelSaveFile, btnCopyFile);

        StackPane root = new StackPane();
        root.getChildren().add(vBox);

        Scene scene = new Scene(root, 300, 250);

        primaryStage.setTitle("Hello World!");
        primaryStage.setScene(scene);
        primaryStage.show();
    }

    public static void main(String[] args) {
        launch(args);
    }

    private void copyFile(File src, File dest) {
        InputStream inputStream = null;
        OutputStream outputStream = null;
        int len;
        byte buffer[] = new byte[512];

        try {
            inputStream = new FileInputStream(src);
            outputStream = new FileOutputStream(dest);

            while ((len = inputStream.read(buffer)) != -1) {
                outputStream.write(buffer, 0, len);
            }
        } catch (FileNotFoundException ex) {
            Logger.getLogger(JavaFX_CopyFile.class.getName())
                    .log(Level.SEVERE, null, ex);
        } catch (IOException ex) {
            Logger.getLogger(JavaFX_CopyFile.class.getName())
                    .log(Level.SEVERE, null, ex);
        } finally {
            try {
                if(inputStream != null){
                    inputStream.close();
                }
                if(outputStream != null){
                    outputStream.close();
                }
            } catch (IOException ex) {
                Logger.getLogger(JavaFX_CopyFile.class.getName())
                        .log(Level.SEVERE, null, ex);
            }
        }

    }

}

Tuesday, January 20, 2015

Prepare ZXing jar on Netbeans

Before we can use ZXing to create QR Code, we have to download, create and add library in Netbeans IDE.

Visit Official ZXing ("Zebra Crossing") project home, If you just need a pre-built JAR file, you can always find compiled resources from the Maven release repository, including recent snapshot/nightly builds.

Download the latest jars, core-3.1.0.jar and core-3.1.0-javadoc.jar in this example.

Then you have to create and add the downloaded zxing library in Netbeans.

This video show how:

QRCode generator on JavaFX, using ZXing

This example show how to generate QR Code using ZXing, an open-source, multi-format 1D/2D barcode image processing library implemented in Java, with ports to other languages.

Before enter the code, you have to download, create and add the ZXing jars in Netbeans IDE.

package javafx_qrcodewriter;

import com.google.zxing.BarcodeFormat;
import com.google.zxing.WriterException;
import com.google.zxing.common.BitMatrix;
import com.google.zxing.qrcode.QRCodeWriter;
import java.awt.Color;
import java.awt.Graphics2D;
import java.awt.image.BufferedImage;
import java.util.logging.Level;
import java.util.logging.Logger;
import javafx.application.Application;
import javafx.embed.swing.SwingFXUtils;
import javafx.scene.Scene;
import javafx.scene.image.ImageView;
import javafx.scene.layout.StackPane;
import javafx.stage.Stage;

/**
 *
 * @web http://java-buddy.blogspot.com/
 */
public class JavaFX_QRCodeWriter extends Application {
    
    @Override
    public void start(Stage primaryStage) {
        
        QRCodeWriter qrCodeWriter = new QRCodeWriter();
        String myWeb = "http://java-buddy.blogspot.com/";
        int width = 300;
        int height = 300;
        String fileType = "png";
        
        BufferedImage bufferedImage = null;
        try {
            BitMatrix byteMatrix = qrCodeWriter.encode(myWeb, BarcodeFormat.QR_CODE, width, height);
            bufferedImage = new BufferedImage(width, height, BufferedImage.TYPE_INT_RGB);
            bufferedImage.createGraphics();
            
            Graphics2D graphics = (Graphics2D) bufferedImage.getGraphics();
            graphics.setColor(Color.WHITE);
            graphics.fillRect(0, 0, width, height);
            graphics.setColor(Color.BLACK);
            
            for (int i = 0; i < height; i++) {
                for (int j = 0; j < width; j++) {
                    if (byteMatrix.get(i, j)) {
                        graphics.fillRect(i, j, 1, 1);
                    }
                }
            }
            
            System.out.println("Success...");
            
        } catch (WriterException ex) {
            Logger.getLogger(JavaFX_QRCodeWriter.class.getName()).log(Level.SEVERE, null, ex);
        }
        
        ImageView qrView = new ImageView();
        qrView.setImage(SwingFXUtils.toFXImage(bufferedImage, null));
        
        StackPane root = new StackPane();
        root.getChildren().add(qrView);
        
        Scene scene = new Scene(root, 350, 350);
        
        primaryStage.setTitle("Hello World!");
        primaryStage.setScene(scene);
        primaryStage.show();
    }

    public static void main(String[] args) {
        launch(args);
    }
    
}

The QR Code generated:


ands scanned:


JavaFX 8 HTMLEditor example, load content from URL

It's a example of JaqvaFX HTMLEditor, its content is loaded from internet using URLConnection on another Thread.


package javafx_htmleditor;

import java.io.IOException;
import java.io.InputStream;
import java.net.MalformedURLException;
import java.net.URL;
import java.net.URLConnection;
import java.util.Scanner;
import java.util.logging.Level;
import java.util.logging.Logger;
import javafx.application.Application;
import javafx.application.Platform;
import javafx.scene.Group;
import javafx.scene.Scene;
import javafx.scene.control.ScrollPane;
import javafx.scene.control.TextArea;
import javafx.scene.layout.VBox;
import javafx.scene.web.HTMLEditor;
import javafx.stage.Stage;

/**
 *
 * @web http://java-buddy.blogspot.com/
 */
public class JavaFX_HTMLeditor extends Application {

    @Override
    public void start(Stage primaryStage) {
        primaryStage.setTitle("java-buddy.blogspot.com");
        Group root = new Group();

        HTMLEditor htmlEditor = new HTMLEditor();
        htmlEditor.setPrefHeight(300);

        TextArea htmlText = new TextArea();
        htmlText.setWrapText(true);

        ScrollPane scrollPane = new ScrollPane();
        scrollPane.setContent(htmlText);
        scrollPane.setFitToWidth(true);
        scrollPane.setPrefHeight(180);

        VBox vBox = new VBox();
        vBox.getChildren().addAll(htmlEditor, scrollPane);

        root.getChildren().add(vBox);
        primaryStage.setScene(new Scene(root, 850, 500));
        primaryStage.show();

        LoadPageThread loadPageThread = 
            new LoadPageThread("http://java-buddy.blogspot.com", htmlEditor, htmlText);
        loadPageThread.start();
    }

    public static void main(String[] args) {
        launch(args);
    }

    class LoadPageThread extends Thread {

        String PageSrc;
        HTMLEditor editor;
        TextArea textArea;

        public LoadPageThread(String src, HTMLEditor editor, TextArea textArea) {
            PageSrc = src;
            this.editor = editor;
            this.textArea = textArea;
        }

        @Override
        public void run() {
            String result = loadPage(PageSrc);
            
            Platform.runLater(() -> {
                //update html code in HTMLEditor
                editor.setHtmlText(result);
                
                //get html code from HTMLEditor
                String html = editor.getHtmlText();
                textArea.setText(html);
            });
        }

        private String loadPage(String src) {

            String pageCode = "";

            try {
                URL url = new URL(src);
                URLConnection connection = url.openConnection();
                InputStream inputStream = connection.getInputStream();
                Scanner scanner = new Scanner(inputStream);

                while (scanner.hasNextLine()) {
                    pageCode += scanner.nextLine() + "\n";
                }

            } catch (MalformedURLException ex) {
                Logger.getLogger(JavaFX_HTMLeditor.class.getName()).log(Level.SEVERE, null, ex);
            } catch (IOException ex) {
                Logger.getLogger(JavaFX_HTMLeditor.class.getName()).log(Level.SEVERE, null, ex);
            }

            return pageCode;
        }
    }

}

Wednesday, January 14, 2015

Iron-Clad Java: Building Secure Web Applications


Proven Methods for Building Secure Java-Based Web Applications

Iron-Clad Java: Building Secure Web Applications

Develop, deploy, and maintain secure Java applications using the expert techniques and open source libraries described in this Oracle Press guide. Iron-Clad Java presents the processes required to build robust and secure applications from the start and explains how to eliminate existing security bugs. Best practices for authentication, access control, data protection, attack prevention, error handling, and much more are included. Using the practical advice and real-world examples provided in this authoritative resource, you'll gain valuable secure software engineering skills.
  • Establish secure authentication and session management processes
  • Implement a robust access control design for multi-tenant web applications
  • Defend against cross-site scripting, cross-site request forgery, and clickjacking
  • Protect sensitive data while it is stored or in transit
  • Prevent SQL injection and other injection attacks
  • Ensure safe file I/O and upload
  • Use effective logging, error handling, and intrusion detection methods
  • Follow a comprehensive secure software development lifecycle
"In this book, Jim Manico and August Detlefsen tackle security education from a technical perspective and bring their wealth of industry knowledge and experience to application designers. A significant amount of thought was given to include the most useful and relevant security content for designers to defend their applications. This is not a book about security theories, it’s the hard lessons learned from those who have been exploited, turned into actionable items for application designers, and condensed into print." ―From the Foreword by Milton Smith, Oracle Senior Principal Security Product Manager, Java

Various Effect on JavaFX ImageView

This post show various Effect applied on ImageView.
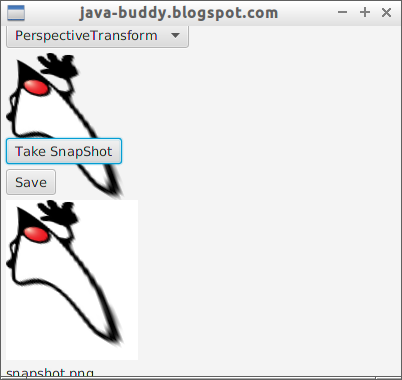


package javafximage;

import java.awt.image.RenderedImage;
import java.io.File;
import java.io.IOException;
import java.util.logging.Level;
import java.util.logging.Logger;
import javafx.application.Application;
import javafx.beans.value.ObservableValue;
import javafx.collections.FXCollections;
import javafx.embed.swing.SwingFXUtils;
import javafx.event.ActionEvent;
import javafx.geometry.Insets;
import javafx.scene.Node;
import javafx.scene.Scene;
import javafx.scene.SnapshotParameters;
import javafx.scene.control.Button;
import javafx.scene.control.ChoiceBox;
import javafx.scene.control.Label;
import javafx.scene.effect.Blend;
import javafx.scene.effect.BlendMode;
import javafx.scene.effect.Bloom;
import javafx.scene.effect.BlurType;
import javafx.scene.effect.BoxBlur;
import javafx.scene.effect.ColorAdjust;
import javafx.scene.effect.ColorInput;
import javafx.scene.effect.DisplacementMap;
import javafx.scene.effect.DropShadow;
import javafx.scene.effect.Effect;
import javafx.scene.effect.FloatMap;
import javafx.scene.effect.GaussianBlur;
import javafx.scene.effect.Glow;
import javafx.scene.effect.ImageInput;
import javafx.scene.effect.InnerShadow;
import javafx.scene.effect.Light;
import javafx.scene.effect.Lighting;
import javafx.scene.effect.MotionBlur;
import javafx.scene.effect.PerspectiveTransform;
import javafx.scene.effect.Reflection;
import javafx.scene.effect.SepiaTone;
import javafx.scene.effect.Shadow;
import javafx.scene.image.Image;
import javafx.scene.image.ImageView;
import javafx.scene.image.WritableImage;
import javafx.scene.layout.StackPane;
import javafx.scene.layout.VBox;
import javafx.scene.paint.Color;
import javafx.stage.Stage;
import javax.imageio.ImageIO;

/**
 *
 * @web http://java-buddy.blogspot.com
 */
public class JavaFXImage extends Application {
    
    @Override
    public void start(Stage primaryStage) {
        
        Image image = new Image("http://goo.gl/kYEQl");
        ImageView imageView = new ImageView();
        imageView.setImage(image);
        
        Image secondImage = new Image("http://goo.gl/Z6Qiw0");
        
        int imageWidth = (int) image.getWidth();
        int imageHeight = (int) image.getHeight();
        
        //Blend effect
        Blend blend = new Blend();
        blend.setMode(BlendMode.COLOR_BURN);
        ColorInput blendColorInput = new ColorInput();
        blendColorInput.setPaint(Color.STEELBLUE);
        blendColorInput.setX(0);
        blendColorInput.setY(0);
        blendColorInput.setWidth(imageWidth);
        blendColorInput.setHeight(imageHeight);
        blend.setTopInput(blendColorInput);
        
        //Bloom effect
        Bloom bloom = new Bloom(0.1);
        
        //BoxBlur effect
        BoxBlur boxBlur = new BoxBlur();
        boxBlur.setWidth(3);
        boxBlur.setHeight(3);
        boxBlur.setIterations(3);
        
        //ColorAdjust effect
        ColorAdjust colorAdjust = new ColorAdjust();
        colorAdjust.setContrast(0.1);
        colorAdjust.setHue(-0.05);
        colorAdjust.setBrightness(0.1);
        colorAdjust.setSaturation(0.2);
        
        //ColorInput effect
        ColorInput colorInput;
        colorInput = new ColorInput(0, 0, 
                imageWidth, imageHeight, Color.STEELBLUE);

        //DisplacementMap effect
        FloatMap floatMap = new FloatMap();
        floatMap.setWidth(imageWidth);
        floatMap.setHeight(imageHeight);

        for (int i = 0; i < imageWidth; i++) {
            double v = (Math.sin(i / 20.0 * Math.PI) - 0.5) / 40.0;
            for (int j = 0; j < imageHeight; j++) {
                floatMap.setSamples(i, j, 0.0f, (float) v);
            }
        }
        DisplacementMap displacementMap = new DisplacementMap();
        displacementMap.setMapData(floatMap);
        
        //DropShadow effect
        DropShadow dropShadow = new DropShadow();
        dropShadow.setRadius(5.0);
        dropShadow.setOffsetX(10.0);
        dropShadow.setOffsetY(5.0);
        dropShadow.setColor(Color.GREY);
        
        //GaussianBlur effect
        GaussianBlur gaussianBlur = new GaussianBlur();
        
        //Glow effect
        Glow glow = new Glow(1.0);
        
        //ImageInput effect
        ImageInput imageInput = new ImageInput(secondImage);
        
        //InnerShadow effect
        InnerShadow innerShadow = new InnerShadow(5.0, 5.0, 5.0, Color.AZURE);
        
        //Lighting effect
        Light.Distant light = new Light.Distant();
        light.setAzimuth(50.0);
        light.setElevation(30.0);
        light.setColor(Color.YELLOW);
        
        Lighting lighting = new Lighting();
        lighting.setLight(light);
        lighting.setSurfaceScale(50.0);
        
        //MotionBlur effect
        MotionBlur motionBlur = new MotionBlur();
        motionBlur.setRadius(30);
        motionBlur.setAngle(-15.0);
        
        //PerspectiveTransform effect
        PerspectiveTransform perspectiveTrasform = new PerspectiveTransform();
        perspectiveTrasform.setUlx(0.0);
        perspectiveTrasform.setUly(0.0);
        perspectiveTrasform.setUrx(imageWidth*1.5);
        perspectiveTrasform.setUry(0.0);
        perspectiveTrasform.setLrx(imageWidth*3);
        perspectiveTrasform.setLry(imageHeight*2);
        perspectiveTrasform.setLlx(0);
        perspectiveTrasform.setLly(imageHeight);
        
        //Reflection effect
        Reflection reflection = new Reflection();
        reflection.setFraction(0.7);
        
        //SepiaTone effect
        SepiaTone sepiaTone = new SepiaTone();
        
        //Shadow effect
        Shadow shadow = new Shadow(BlurType.THREE_PASS_BOX, Color.BLUE, 10.0);
        
        Effect effects[] = {
            null,
            blend,
            bloom,
            boxBlur,
            colorAdjust,
            colorInput,
            displacementMap,
            dropShadow,
            gaussianBlur,
            glow,
            imageInput,
            innerShadow,
            lighting,
            motionBlur,
            perspectiveTrasform,
            reflection,
            sepiaTone,
            shadow
        };
        
        ChoiceBox choiceBox = new ChoiceBox(
            FXCollections.observableArrayList(
                "null", "Blend", "Bloom", "BoxBlur", "ColorAdjust",
                "ColorInput", "DisplacementMap", "DropShadow",
                "GaussianBlur", "Glow", "ImageInput", "InnerShadow",
                "Lighting", "MotionBlur", "PerspectiveTransform",
                "Reflection", "SepiaTone", "Shadow"
            ));
        choiceBox.getSelectionModel().selectFirst();
        
        choiceBox.getSelectionModel().selectedIndexProperty()
            .addListener((ObservableValue<? extends Number> observable, 
                Number oldValue, Number newValue) -> {
            imageView.setEffect(effects[newValue.intValue()]);
        });
        
        ImageView retrievedImage = new ImageView();
        Label labelPath = new Label();
        
        Button btnSnapShot = new Button("Take SnapShot");
        btnSnapShot.setOnAction((ActionEvent event) -> {
            File savedFile = takeSnapShot(imageView);
            retrieveImage(savedFile, retrievedImage, labelPath);
        });
        
        Button btnSaveImage = new Button("Save");
        btnSaveImage.setOnAction((ActionEvent event) -> {
            File savedFile = saveImage(imageView);
            retrieveImage(savedFile, retrievedImage, labelPath);
        });

        VBox vBox = new VBox();
        vBox.setSpacing(5);
        vBox.setPadding(new Insets(5, 5, 5, 5));
        vBox.getChildren().addAll(choiceBox, imageView, btnSnapShot, 
                btnSaveImage, retrievedImage, labelPath);
        
        StackPane root = new StackPane();
        root.getChildren().add(vBox);

        Scene scene = new Scene(root, 400, 350);
        
        primaryStage.setTitle("java-buddy.blogspot.com");
        primaryStage.setScene(scene);
        primaryStage.show();
    }

    public static void main(String[] args) {
        launch(args);
    }
    
    //Take SnapShot and save
    private File takeSnapShot(Node node){

        WritableImage writableImage = node.snapshot(new SnapshotParameters(), null);
        
        File file = new File("snapshot.png");
        
        try {
            ImageIO.write(SwingFXUtils.fromFXImage(writableImage, null), "png", file);
            System.out.println("snapshot saved: " + file.getAbsolutePath());
            return file;
        } catch (IOException ex) {
            Logger.getLogger(JavaFXImage.class.getName()).log(Level.SEVERE, null, ex);
            return null;
        }
    }
    
    //Save Image of ImageView
    private File saveImage(ImageView iv){
        Image img = iv.getImage();
        File file = new File("savedImage.png");
        RenderedImage renderedImage = SwingFXUtils.fromFXImage(img, null);
        try {
            ImageIO.write(renderedImage, "png", file);
            System.out.println("Image saved: " + file.getAbsolutePath());
            return file;
        } catch (IOException ex) {
            Logger.getLogger(JavaFXImage.class.getName()).log(Level.SEVERE, null, ex);
            return null;
        }
    }
    
    //Retrieve saved image
    private void retrieveImage(File file, ImageView imageView, Label label){
        if(file != null){
            Image image = new Image(file.toURI().toString());
            imageView.setImage(image);
            
            label.setText(file.getName() + "\n"
                    + image.getWidth() + " x " + image.getHeight());
        }else{
            label.setText("");
            imageView.setImage(null);
        }
    }
}

Friday, January 9, 2015

Apply DropShadow effect on ImageView

The example code show how to apply DropShadow effect on ImageView, by calling imageView.setEffect(new DropShadow()). Also save the image using node.snapshot() and ImageView.getImage(), to check how it affect the image.


package javafximage;

import java.awt.image.RenderedImage;
import java.io.File;
import java.io.IOException;
import java.util.logging.Level;
import java.util.logging.Logger;
import javafx.application.Application;
import javafx.embed.swing.SwingFXUtils;
import javafx.event.ActionEvent;
import javafx.geometry.Insets;
import javafx.scene.Node;
import javafx.scene.Scene;
import javafx.scene.SnapshotParameters;
import javafx.scene.control.Button;
import javafx.scene.control.Label;
import javafx.scene.effect.DropShadow;
import javafx.scene.image.Image;
import javafx.scene.image.ImageView;
import javafx.scene.image.WritableImage;
import javafx.scene.layout.StackPane;
import javafx.scene.layout.VBox;
import javafx.scene.paint.Color;
import javafx.stage.Stage;
import javax.imageio.ImageIO;

/**
 *
 * @web http://java-buddy.blogspot.com
 */
public class JavaFXImage extends Application {
    
    @Override
    public void start(Stage primaryStage) {

        Image image = new Image("http://goo.gl/kYEQl");
        ImageView imageView = new ImageView();
        imageView.setImage(image);
        
        imageView.setEffect(new DropShadow(20, Color.BLACK));
        
        ImageView retrievedImage = new ImageView();
        Label labelPath = new Label();
        
        Button btnSnapShot = new Button("Take SnapShot");
        btnSnapShot.setOnAction((ActionEvent event) -> {
            File savedFile = takeSnapShot(imageView);
            retrieveImage(savedFile, retrievedImage, labelPath);
        });
        
        Button btnSaveImage = new Button("Save");
        btnSaveImage.setOnAction((ActionEvent event) -> {
            File savedFile = saveImage(imageView);
            retrieveImage(savedFile, retrievedImage, labelPath);
        });

        VBox vBox = new VBox();
        vBox.setSpacing(5);
        vBox.setPadding(new Insets(5, 5, 5, 5));
        vBox.getChildren().addAll(imageView, btnSnapShot, 
                btnSaveImage, retrievedImage, labelPath);
        
        StackPane root = new StackPane();
        root.getChildren().add(vBox);

        Scene scene = new Scene(root, 400, 350);
        
        primaryStage.setTitle("java-buddy.blogspot.com");
        primaryStage.setScene(scene);
        primaryStage.show();
    }

    public static void main(String[] args) {
        launch(args);
    }
    
    //Take SnapShot and save
    private File takeSnapShot(Node node){

        WritableImage writableImage = node.snapshot(new SnapshotParameters(), null);
        
        File file = new File("snapshot.png");
        
        try {
            ImageIO.write(SwingFXUtils.fromFXImage(writableImage, null), "png", file);
            System.out.println("snapshot saved: " + file.getAbsolutePath());
            return file;
        } catch (IOException ex) {
            Logger.getLogger(JavaFXImage.class.getName()).log(Level.SEVERE, null, ex);
            return null;
        }
    }
    
    //Save Image of ImageView
    private File saveImage(ImageView iv){
        Image img = iv.getImage();
        File file = new File("savedImage.png");
        RenderedImage renderedImage = SwingFXUtils.fromFXImage(img, null);
        try {
            ImageIO.write(renderedImage, "png", file);
            System.out.println("Image saved: " + file.getAbsolutePath());
            return file;
        } catch (IOException ex) {
            Logger.getLogger(JavaFXImage.class.getName()).log(Level.SEVERE, null, ex);
            return null;
        }
    }
    
    //Retrieve saved image
    private void retrieveImage(File file, ImageView imageView, Label label){
        if(file != null){
            Image image = new Image(file.toURI().toString());
            imageView.setImage(image);
            
            label.setText(file.getName() + "\n"
                    + image.getWidth() + " x " + image.getHeight());
        }else{
            label.setText("");
            imageView.setImage(null);
        }
    }
}

Wednesday, January 7, 2015

Easy Maps Apps in Java and Python

Integrating Google Maps API services into applications provides a great set of location based services for powerful functionality. If you write server side applications in Java or Python, accessing these APIs requires some way to talk to the Google Maps server REST APIs that provide the interfaces.

Google have built an open-source set of client libraries that take care of all the nitty-gritty detail of connecting, and managing Maps API services for both Java and Python.

Alex Danilo introduces these libraries, and what they do - allowing Java and Python server side application developers to save time integrating Maps API services into their applications.

These libraries streamline and simplify the work required to get an application up and running by taking care of things like retry for dropped connections, rate limiting to make sure applications manage their quota, and more.

Documentation for the client libraries is on the Google Developers Site here, and the open source project code is on github here.

If you develop in Java or Python, you should definitely take a look.

Easy Maps Apps in Java and Python

Monday, January 5, 2015

Take snapshot of your JavaFX application

Scene.snapshot() takes a snapshot of scene and returns the rendered image when it is ready.

Example:
package javafxsnapshot;

import java.io.File;
import java.io.IOException;
import java.util.logging.Level;
import java.util.logging.Logger;
import javafx.application.Application;
import javafx.embed.swing.SwingFXUtils;
import javafx.event.ActionEvent;
import javafx.event.EventHandler;
import javafx.scene.Scene;
import javafx.scene.control.Button;
import javafx.scene.image.WritableImage;
import javafx.scene.layout.StackPane;
import javafx.stage.Stage;
import javax.imageio.ImageIO;

/**
 *
 * @web http://java-buddy.blogspot.com
 */
public class JavaFXSnapshot extends Application {
    
    @Override
    public void start(Stage primaryStage) {
        
        StackPane root = new StackPane();
        Scene scene = new Scene(root, 300, 250);
        
        Button btn = new Button();
        btn.setText("Say 'Hello World'");
        btn.setOnAction(new EventHandler<ActionEvent>() {
            
            @Override
            public void handle(ActionEvent event) {
                System.out.println("Hello World!");
                takeSnapShot(scene);
                
            }
        });

        root.getChildren().add(btn);

        primaryStage.setTitle("Hello World!");
        primaryStage.setScene(scene);
        primaryStage.show();
    }

    public static void main(String[] args) {
        launch(args);
    }
    
    private void takeSnapShot(Scene scene){
        WritableImage writableImage = 
            new WritableImage((int)scene.getWidth(), (int)scene.getHeight());
        scene.snapshot(writableImage);
        
        File file = new File("snapshot.png");
        try {
            ImageIO.write(SwingFXUtils.fromFXImage(writableImage, null), "png", file);
            System.out.println("snapshot saved: " + file.getAbsolutePath());
        } catch (IOException ex) {
            Logger.getLogger(JavaFXSnapshot.class.getName()).log(Level.SEVERE, null, ex);
        }
    }
    
}

Thursday, January 1, 2015

Beginning Java 8 Games Development

Beginning Java 8 Games Development , written by Java expert and author Wallace Jackson, teaches you the fundamentals of building a highly illustrative game using the Java 8 programming language. In this book, you'll employ open source software as tools to help you quickly and efficiently build your Java game applications. You'll learn how to utilize vector and bit-wise graphics; create sprites and sprite animations; handle events; process inputs; create and insert multimedia and audio files; and more.

Furthermore, you'll learn about JavaFX 8, now integrated into Java 8 and which gives you additional APIs that will make your game application more fun and dynamic as well as give it a smaller foot-print; so, your game application can run on your PC, mobile and embedded devices.

After reading and using this tutorial, you'll come away with a cool Java-based 2D game application template that you can re-use and apply to your own game making ambitions or for fun.

What you’ll learn
  • How to develop games using Java 8
  • How to employ vector-based graphics or bitmap graphics
  • How to create your 2D game sprites
  • How to animate those game sprites
  • How to handle events to process player input
  • How to optimize and implement digital audio assets

Who this book is for
This book is for game developers with little experience using Java, little experience in developing games, or both.

Table of Contents
1. Setting Up a Java 8 Game Development Environment
2. Setting Up Your Java 8 IDE
3. A Java 8 Primer
4. An Introduction to JavaFX 8
5. An Introduction to Game Design
6. The Foundation of Game Design
7. The Foundation of Game Play Loop
8. Creating Your Actor Engine
9. Controlling Your Action Figure
10. Directing the Cast of Actors
11. Moving Your Action Figure in 2D
12. Setting Boundaries for Your Action Figure in 2D
13. Animating Your Action Figure States
14. Setting Up the Game Environment
15. Implementing Game Audio Assets
16. Collision Detection
17. Enhancing Game Play