Sunday, June 30, 2013

Display smiley face character in Java

Example to display smiley face character (☺) in Java:

Display smiley face character in Java


package javaex_smileyface;

/**
 * @web http://java-buddy.blogspot.com/
 */
public class JavaEx_SmileyFace {

    public static void main(String[] args) {
        System.out.println('\u263A');
        System.out.println('☺');
    }
}


remark: Not all Operating Systems can display extended Unicode symbols, regardless of bundling the fonts with the programs. If it can't display the Unicode symbol, it displays a Square instead.

Monday, June 24, 2013

Field Guide to Java Collections

Field Guide to Java Collections

This session presents a survey of the principal families (list, set, map, and queue) of the Java collections ecosystem and their major and minor members. It examines differences between the collection families and family members, with special attention to the preferred environment of each collection species. Exotic, rarely seen creatures such as SynchronousQueue and ConcurrentSkipListMap are also included. The discussion of the recent evolutionary advances to collections and insights from the fossil record will inform and inspire all those who delight in these most ubiquitous of Java classes.

Sunday, June 23, 2013

Setup RxTx jar and .so for Ubuntu

The former post describe how to "Install RXTX on Ubuntu". It simple download the files to your system, but Java not know where is it! To work with installed RxTx, you have to setup Build Path to compile the code, and copy the binaries (.so files) to java library path.

Setup Java Build Path in NetBeans:

If build path not set correctly, error of "package gnu.io does not exist" will be thrown.
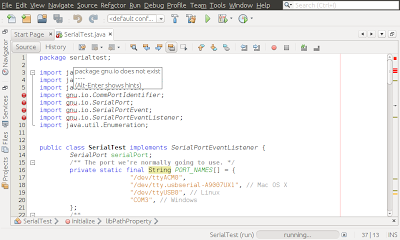
package gnu.io does not exist
"package gnu.io does not exist" thrown without Build Path set
- Right click your project, select Properties.
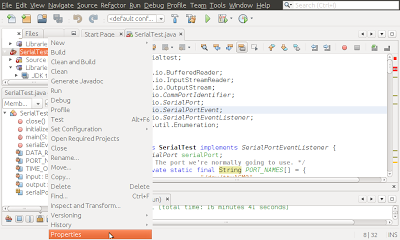
Setup project properties
- Select Libraries in Categories, Compiler tab and click Add JAR/Folder button.
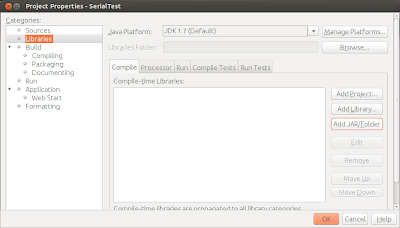
Add JAR/Folder
Add JAR/Folder
- Browse to select RXTXcomm.jar, should be in /usr/share/java folder, and click OK to accept.
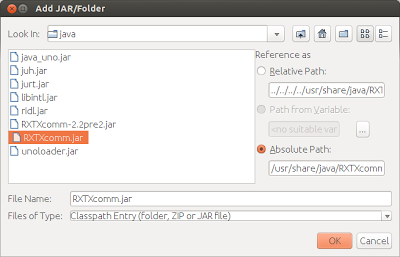
Add RXTXcomm.jar
Add RXTXcomm.jar
- Click OK again to finish. It should be compiled without error.

Copy the binaries (.so files) to java library path:

Without corresponding .so files in java library path, you will get error of "UnsatisfiedLinkError: no rxtxSerial in java.library.path" in run time, like this:

java.lang.UnsatisfiedLinkError: no rxtxSerial in java.library.path thrown while loading gnu.io.RXTXCommDriver
Exception in thread "main" java.lang.UnsatisfiedLinkError: no rxtxSerial in java.library.path
at java.lang.ClassLoader.loadLibrary(ClassLoader.java:1878)
at java.lang.Runtime.loadLibrary0(Runtime.java:849)
at java.lang.System.loadLibrary(System.java:1087)
at gnu.io.CommPortIdentifier.<clinit>(CommPortIdentifier.java:123)
at serialtest.SerialTest.initialize(SerialTest.java:41)
at serialtest.SerialTest.main(SerialTest.java:109)
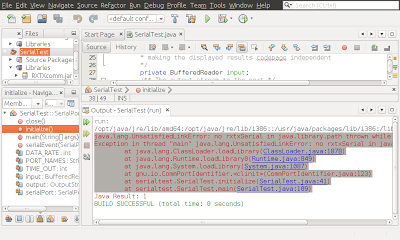
UnsatisfiedLinkError

- Refer to the post "Get property of java library path" to know where is the library folder.

- Copy the binaries librxtxSerial.so and librxtxParallel.so (should be in /usr/lib/jni/) to one of the library folder (for example: /opt/java/jre/lib/i386/).

$sudo cp /usr/lib/jni/librxtxSerial.so /opt/java/jre/lib/i386/librxtxSerial.so
$sudo cp /usr/lib/jni/librxtxParallel.so /opt/java/jre/lib/i386/librxtxParallel.so


Saturday, June 22, 2013

Get property of java library path

To get current setting of java library path, call System.getProperty("java.library.path").

Example:
package javalibpath;

public class JavaLibPath {

    public static void main(String[] args) {
        String libPathProperty = System.getProperty("java.library.path");
        System.out.println(libPathProperty);
    }
}


Get property of java library path
Check the Output window

Install RXTX on Ubuntu

RXTX is a full implementation of the Java CommAPI from Sun. It contains native libraries providing serial and parallel communication for the Java Development Toolkit.

A easy way to install RXTX on Ubuntu is using Synaptic Package Manager (Synaptic Package Manager is available in Ubuntu Software Center).

Simple search rxtx in Synaptic Package Manager, and mark to install

Install RxTx on Ubuntu with Synaptic Package Manager

The jars will be installed in /usr/share/java folder.

- Alternatively, you can use the command in Terminal:
$sudo apt-get install librxtx-java

Remark: It copy the files only. To make it work with Java, you have to "Setup RxTx jar and .so for Ubuntu".


JavaFX Document updated with JavaFX 2.2.25

JavaFX Documentation updated for JavaFX 2.2.25, with File Chooser added and WebView reworked.

JavaFX 2 Documentation


The File Chooser chapter of the UI Controls tutorial has become the main addition to the JavaFX documentation set. This chapter explains how to use the FileChooser class of the JavaFX API to enable navigating the file system. The document comes with several samples to explain how to open one or several files with the associated application, configure a file chooser dialog window, and save the application content. You can study the source code of the FileChooserSample application or download the NetBeans project with all the samples available in the JavaFX UI Controls tutorial.

The WebView tutorial is reworked by the JavaFX 2.2.25 release to address changes in the WebViewSample application. Find the modified version at docs.oracle.com/javafx.

source: The Java Tutorials' Weblog - JDK 7u25 and JavaFX 2.2.25 Documentation Updates

NetBeans IDE 7.3.1 with Java EE 7 Support

An overview of the Java EE 7 features provided by NetBeans IDE 7.3.1. It shows the project templates, samples, file templates, and editor features that enable you to get the most out of Java EE 7.


Beginning EJB 3, Java EE 7 Edition

Targeted at Java and Java EE developers both with and without prior Enterprise JavaBeans (EJB) experience, Beginning EJB 3, Java EE 7 Edition will guide you in building enterprise software based on the latest cross-platform industry standards.  Learn how to use the EJB 3 API to develop powerful, standards-based backend business logic for creating the complex enterprise applications that run today's transactions and more.

With over 20 years of combined EJB experience, the authors offer many practical insights into designing and coding EJB components in combination with related Java EE technologies.  EJB has made huge advances in the ease of building enterprise, server-side Java components and business logic development, and has drastically simplified programming models and design patterns. Use this book to harness that power and take your enterprise Java development to the next level.

Wednesday, June 19, 2013

Java SE 7u25 released


Java SE 7u25 released including important security fixes. Oracle strongly recommends that all Java SE 7 users upgrade to this release.

>> Java SE Download.

Monday, June 17, 2013

JDeveloper Tutorial: Building Mobile Applications with Oracle ADF Mobile

This tutorial, Building Mobile Applications with Oracle ADF Mobile, you use Oracle JDeveloper and Oracle ADF Mobile to build and deploy a mobile application.

JDeveloper Tutorial: Building Mobile Applications with Oracle ADF Mobile
The application uses a simple Java class to store the data and displays a list of employees on one page and a graph of salaries on another. As you build the application, you will add ADF layout components to further control and customize the behavior of the application.

In Part 2 of the tutorial, you add a call to a web service that accepts arguments and upgrades the salary of an employee. In Part 3, you add specific device integration to your application.

Sunday, June 16, 2013

Auto adjust width of Rectangle when parent resized

Last post demonstrate how to "Create Rectangle with width according to parent". It define width of the Rectangle when it was built. When the parent window resized, it will not follow.

To make width of the Rectangle, rect, follow parent window resizing automatically, we can call rect.widthProperty().bind() with parent's widthProperty.

rect.widthProperty().bind(scene.widthProperty().subtract(20));

Auto adjust width of Rectangle when parent resized


package javafxrect;

import javafx.application.Application;
import javafx.event.ActionEvent;
import javafx.event.EventHandler;
import javafx.geometry.Insets;
import javafx.scene.Scene;
import javafx.scene.control.Button;
import javafx.scene.layout.VBox;
import javafx.scene.paint.Color;
import javafx.scene.shape.Rectangle;
import javafx.scene.shape.RectangleBuilder;
import javafx.stage.Stage;

/**
 * @web http://java-buddy.blogspot.com/
 */
public class JavaFXRect extends Application {
    
    @Override
    public void start(Stage primaryStage) {
        //Group root = new Group();
        VBox root = new VBox(5);    // spacing = 5
        root.setPadding(new Insets(10, 10, 10, 10));
        
        Scene scene = new Scene(root, 300, 250);
        
        Button btn = new Button();
        btn.setText("java-buddy.blogspot.com");
        btn.setOnAction(new EventHandler<ActionEvent>() {
            @Override
            public void handle(ActionEvent event) {
                System.out.println("Hello World!");
            }
        });
        
        //Create Rectangle with RectangleBuilder
        Rectangle rect = RectangleBuilder
                .create()
                .width(scene.getWidth() - 20)
                .height(50)
                .fill(Color.AZURE)
                .stroke(Color.rgb(150, 150, 150))
                .strokeWidth(3)
                .build();
        
        //adjust rect width follow scene resizing
        rect.widthProperty().bind(scene.widthProperty().subtract(20));

        root.getChildren().addAll(rect, btn);

        primaryStage.setTitle("Hello World!");
        primaryStage.setScene(scene);
        primaryStage.show();
    }

    public static void main(String[] args) {
        launch(args);
    }
}


Friday, June 14, 2013

Create Rectangle with RectangleBuilder, set width according to parent.

This exercise create a Rectangle object with RectangleBuilder, set width according to its parent, scene.

Create Rectangle with RectangleBuilder, set width according to parent.


package javafxrect;

import javafx.application.Application;
import javafx.event.ActionEvent;
import javafx.event.EventHandler;
import javafx.geometry.Insets;
import javafx.scene.Scene;
import javafx.scene.control.Button;
import javafx.scene.layout.VBox;
import javafx.scene.paint.Color;
import javafx.scene.shape.Rectangle;
import javafx.scene.shape.RectangleBuilder;
import javafx.stage.Stage;

/**
 * @web http://java-buddy.blogspot.com/
 */
public class JavaFXRect extends Application {
    
    @Override
    public void start(Stage primaryStage) {
        //Group root = new Group();
        VBox root = new VBox(5);    // spacing = 5
        root.setPadding(new Insets(10, 10, 10, 10));
        
        Scene scene = new Scene(root, 300, 250);
        
        Button btn = new Button();
        btn.setText("java-buddy.blogspot.com");
        btn.setOnAction(new EventHandler<ActionEvent>() {
            @Override
            public void handle(ActionEvent event) {
                System.out.println("Hello World!");
            }
        });
        
        //Create Rectangle with RectangleBuilder
        Rectangle rect = RectangleBuilder
                .create()
                .width(scene.getWidth() - 20)
                .height(50)
                .fill(Color.AZURE)
                .stroke(Color.rgb(150, 150, 150))
                .strokeWidth(3)
                .build();

        root.getChildren().addAll(rect, btn);

        primaryStage.setTitle("Hello World!");
        primaryStage.setScene(scene);
        primaryStage.show();
    }

    public static void main(String[] args) {
        launch(args);
    }
}


Next:
- Auto adjust width of Rectangle when parent resized


Wednesday, June 12, 2013

IntelliJ IDEA 12.1.4 Update is Available

IntelliJ IDEA 12.1.4 features about 70 issues fixed. You can see the whole list in the Release Notes.

Patches are available for a quick update from earlier 12.x versions or you can download the full installer from IntelliJ IDEA web site.

Source: JetBrains IntelliJ IDEA Blog

NetBeans IDE 7.3.1 Released with Java EE 7 Support

NetBeans.org Community News: NetBeans IDE 7.3.1 is an update to NetBeans IDE 7.3, know more: https://netbeans.org/community/news/show/1591.html

Java EE 7 Overview


Arun Gupta talks about the implementation status of Java EE 7 and looks ahead to Java EE 8.

Saturday, June 8, 2013

Print all digit in Unicode using java.lang.Character

The java.lang.Character class wraps a value of the primitive type char in an object. An object of type Character contains a single field whose type is char.

In addition, this class provides several methods for determining a character's category (lowercase letter, digit, etc.) and for converting characters from uppercase to lowercase and vice versa.

Character information is based on the Unicode Standard, version 6.0.0.

Character.MAX_CODE_POINT is the maximum value of a Unicode code point, constant U+10FFFF.

Character.isDigit(int codePoint) method determines if the specified character (Unicode code point) is a digit.


It's a example to print all digit in Unicode:

Print all digit in Unicode

package java_unicodecodepoint;

/**
 * @web http://java-buddy.blogspot.com/
 */
public class Java_UnicodeCodePoint {

    public static void main(String[] args) {
        System.out.println("http://java-buddy.blogspot.com/");
        int maxCodePoint = Character.MAX_CODE_POINT;
        System.out.printf("MAX_CODE_POINT = %x\n", maxCodePoint);
        
        //print all digital Unicode
        for(int i=0; i<=maxCodePoint; i++){
            if(Character.isDigit(i)){
                System.out.printf("Unicode: %x\t%c\tName:%s\n", 
                    i, i, Character.getName(i));
            }
        }
    }
}


Sunday, June 2, 2013

JavaFX ComboBox for custom object

The post "Simple example of JavaFX ComboBox" with elements of String. This post demonstrate how to implement ComboBox for custom object, we have to override toString() method of the custom class to display text on the box, and also call setCellFactory() to supply Callback to display text on the drop-down ListView.

JavaFX ComboBox for custom object


package javafxcombobox;

import javafx.application.Application;
import javafx.collections.FXCollections;
import javafx.collections.ObservableList;
import javafx.event.ActionEvent;
import javafx.event.EventHandler;
import javafx.geometry.Insets;
import javafx.scene.Scene;
import javafx.scene.control.Button;
import javafx.scene.control.ComboBox;
import javafx.scene.control.Label;
import javafx.scene.control.ListCell;
import javafx.scene.control.ListView;
import javafx.scene.layout.StackPane;
import javafx.scene.layout.VBox;
import javafx.stage.Stage;
import javafx.util.Callback;

/**
 * @web http://java-buddy.blogspot.com/
 */
public class JavaFXComboBox extends Application {
    
    class Site{
        String name;
        String webaddr;
        
        Site(String n, String a){
            name = n;
            webaddr = a;
        }

        @Override
        public String toString() {
            return name;
        }

    }
    
    ObservableList<Site> siteList = 
            FXCollections.observableArrayList(
                new Site("Google", "http://www.google.com"),
                new Site("MicroSoft", "http://www.microsoft.com"),
                new Site("Apple", "http://www.apple.com"),
                new Site("Java-Buddy", "http://java-buddy.blogspot.com/")
            );

    @Override
    public void start(Stage primaryStage) {
        
        final ComboBox comboBox = new ComboBox(siteList);
        comboBox.getSelectionModel().selectFirst(); //select the first element
        
        comboBox.setCellFactory(new Callback<ListView<Site>,ListCell<Site>>(){

            @Override
            public ListCell<Site> call(ListView<Site> p) {
                
                final ListCell<Site> cell = new ListCell<Site>(){

                    @Override
                    protected void updateItem(Site t, boolean bln) {
                        super.updateItem(t, bln);
                        
                        if(t != null){
                            setText(t.name + ":" + t.webaddr);
                        }else{
                            setText(null);
                        }
                    }
 
                };
                
                return cell;
            }
        });
        
        final Label label = new Label();
        
        Button btn = new Button();
        btn.setText("Read comboBox");
        btn.setOnAction(new EventHandler<ActionEvent>() {
            @Override
            public void handle(ActionEvent event) {
                label.setText("selected: " + comboBox.getValue());
            }
        });

        VBox vBox = new VBox();
        vBox.setPadding(new Insets(5, 5, 5, 5));
        vBox.setSpacing(5);
        vBox.getChildren().addAll(label, comboBox, btn);
        
        StackPane root = new StackPane();
        root.getChildren().add(vBox);
        
        Scene scene = new Scene(root, 300, 250);
        
        primaryStage.setTitle("Hello World!");
        primaryStage.setScene(scene);
        primaryStage.show();
    }

    public static void main(String[] args) {
        launch(args);
    }
}


IntelliJ IDEA 12.1 now support JavaFX 2, Android UI designer, Java 8 and more...

IntelliJ IDEA 12.1 now support:
  • JavaFX 2.0
  • Android UI designer
  • Play framework 2.0
  • Spring frameworks
  • Java 8
  • Faster compiler
  • and many more...
Getting Started with Java 8 in IntelliJ IDEA 12.1

JavaFX 2 Support in IntelliJ IDEA 12.1